インフラソリューション部の”のなか”です。
今回はansible_specという自動化ツールによるサーバーのテストについての話になります。
ansible_specを使えるようになると、LAMP環境の構築からサーバーのテストまで5分程度で完了するようになります。
それではansible_specを使えるようになるためにansible_specの使い方について説明していきます。
Serverspecとは
ansible_specの前にまずServerspecについて説明していきます。
ServerspecとはrubyのテストフレームワークであるRSpecを利用して、サーバーの構成が正しいかどうかをテストする構成管理のテスト自動化ツールです。
ansible_specとは
ansible_specのリポジトリでは次のように説明されています。
This is a Ruby gem that implements an Ansible Config Parser for Serverspec.
It creates a Rake task that can run tests, using Ansible inventory files and playbooks.
You can test multiple roles and multiple hosts.
ansible_specを簡潔に説明するとAnsibleとServerspecを1つのリポジトリで管理することができ、複数のホストの状態をテストすることができる自動化ツールです。
Ansibleに関してはこちらの記事で説明しているため説明を省略します。
ansible_specだとroleごとにServerspecのテストを記述できるため、今まで1つずつ目視確認サーバーの構成を一目で確認できるようになります。
例えば今回の構成ではWEB・DB・APでroleを分けており、Serverspecのテストコードを作成しています。
開発環境
- (ホストOS) windows 10
- (ゲストOS) Ubuntu 20.04.5
- Vagrant 2.3.0
- virtualbox 6.1
- Ansible 2.9.6
注意点
今回は説明上、パスワードを平文で設定していますが、実際にサーバーを構築する際は暗号化する等の対策が必要**になります。
本文の説明で参考程度に今回使用したVagrantfileを記載していますが、vagrantやvirtualboxについての説明や構成図等は省略しています。
秘密鍵はRSAを使用していますが、ed25519等を使用する場合はVagrantfileを修正してください。
OSのバージョン等の環境によって実行結果が異なることがあります。
aws等のvagrant以外で実行する場合はユーザー名やIPアドレスを読み替えて実施してください。
前提条件
- virtualboxがインストール済み
- vagrantがインストール済み
- vagrantのboxはbento/ubuntu-20.04を使用
- chrony.confが用意済み
- php.iniが用意済み
- id_rsa(秘密鍵)とauthorized_keysが用意済み
ディレクトリ構成
/etc/ansibleの配下は最終的に以下のディレクトリ構成になります。
.
├── README.md
├── Rakefile
├── ansible.cfg
├── hosts
├── roles
│   ├── apache2
│   │   ├── spec
│   │   │   ├── apache2ufw_spec.rb
│   │   │   ├── package_spec.rb
│   │   │   └── service_spec.rb
│   │   └── tasks
│   │       └── main.yml
│   ├── common
│   │   ├── files
│   │   │   └── chrony.conf
│   │   ├── spec
│   │   │   ├── package_spec.rb
│   │   │   ├── service_spec.rb
│   │   │   └── systemconf_spec.rb
│   │   └── tasks
│   │       └── main.yml
│   ├── mariadb
│   │   ├── spec
│   │   │   ├── package_spec.rb
│   │   │   └── service_spec.rb
│   │   ├── tasks
│   │   │   └── main.yml
│   │   └── vars
│   │       └── main.yml
│   └── php
│       ├── files
│       │   └── php.ini
│       ├── spec
│       │   ├── conf_spec.rb
│       │   └── package_spec.rb
│       └── tasks
│           └── main.yml
├── site.yml
└── spec
    └── spec_helper.rb
事前準備
1. (ホストOS)Vagrantfileを用意
ホストOSのvagrantコマンドが実行可能なディレクトリで、以下Vagrantfileを用意します。
# -*- mode: ruby -*-
# vi: set ft=ruby :
Vagrant.configure("2") do |config|
  config.vm.box = "bento/ubuntu-20.04"

  # SSH設定
  config.ssh.insert_key = false
  config.ssh.private_key_path = "~/.vagrant.d/insecure_private_key"
  config.vm.provision "file", source: "~/.vagrant.d/insecure_private_key", destination: "/home/vagrant/.ssh/id_rsa"
  config.vm.provision "shell", inline: "chmod 600 /home/vagrant/.ssh/id_rsa"


  # ローカルマシンのdataディレクトリと仮想マシン内の/vagrant_dataディレクトリを共有フォルダにする
  config.vm.synced_folder "./data", "/vagrant_data"

  # 初期設定
  config.vm.provision :shell, :inline => <<-EOS
    sudo apt -y update
    sudo apt -y full-upgrade
    sudo apt install -y language-pack-ja
    localectl set-locale LANG=ja_JP.UTF-8 LANGUAGE="ja_JP:ja"
    update-locale LANG=ja_JP.UTF-8
    sudo cp /vagrant_data/authorized_keys ~/.ssh
    sudo cp /vagrant_data/id_rsa ~/.ssh
    sudo chown root:root /root/.ssh/authorized_keys
    sudo chown root:root /root/.ssh/id_rsa
    sudo chmod 600 /root/.ssh/authorized_keys
    sudo chmod 600 /root/.ssh/id_rsa
  EOS

  # ansible実行する側のサーバーを設定
  config.vm.define "ansible-controller" do |ansible_controller|
    ansible_controller.vm.network "private_network", ip: "192.168.56.20"
    ansible_controller.vm.hostname = "ansible-controller.localhost"

    ansible_controller.vm.provider :virtualbox do |vb|
      vb.memory = 1024
      vb.name = "ansible-controller"
    end

  end

  # ansible実行されるwebとapサーバーを設定
  config.vm.define "ansible-node-lamp" do |ansible_node_lamp|
    ansible_node_lamp.vm.network "private_network", ip: "192.168.56.21"
    ansible_node_lamp.vm.hostname = "ansible-node-lamp.localhost"
    ansible_node_lamp.vm.network "forwarded_port", guest: 80, host: 8080, host_ip: "127.0.0.1"

    ansible_node_lamp.vm.provider :virtualbox do |vb|
      vb.memory = 2048
      vb.name = "ansible-node-lamp"
    end

  end

end
2. (ホストOS)鍵を配置
ホストOSのVagrantfileがあるフォルダに共有フォルダのdataというフォルダを作成し、id_rsaと
authorized_keysとchrony.confとphp.iniを配置します。
chrony.confはデフォルトのntpサーバーをコメントアウトし、以下設定を追加しています。
pool ntp.nict.jp iburst
pool ntp.jst.mfeed.ad.jp iburst
php.iniはデフォルトの設定にタイムゾーンを追加しています。
date.timezone = "Asia/Tokyo"3. (ホストOS)検証環境構築
Vagrantfileとdataフォルダの準備が完了したらvagrant upで環境を構築します。
構築
1. パッケージをインストール
ansible-controllerにSSHし、以下コマンドでパッケージをインストールします。
sudo su -
apt -y install ansible
ansible-galaxy collection install community.mysql
ansible-galaxy collection install community.general
パッケージインストール後に以下コマンドでディレクトリを作成します。
cd /etc/ansible
mkdir -p /etc/ansible/roles/common/files
mkdir /etc/ansible/roles/common/tasks
mkdir -p /etc/ansible/roles/apache2/tasks
mkdir -p /etc/ansible/roles/mariadb/tasks
mkdir /etc/ansible/roles/mariadb/vars
mkdir -p /etc/ansible/roles/php/files
mkdir /etc/ansible/roles/php/tasks
2. hostsファイルにsshの設定を追記
vi /etc/ansible/hostsでwebサーバーとdbサーバーのSSHの設定を追記します。
[lamp]
192.168.56.21 ansible_ssh_private_key_file=~/.ssh/id_rsa

; [apache2]
; 192.168.56.21 ansible_ssh_private_key_file=~/.ssh/id_rsa

; [mariadb]
; 192.168.56.20 ansible_ssh_private_key_file=~/.ssh/id_rsa

; [php]
; 192.168.56.21 ansible_ssh_private_key_file=~/.ssh/id_rsa
3. ansibleのplaybookを作成
まずansibleで実行するためのplaybookをvi /etc/ansible/site.ymlで作成します。
- hosts: all
  gather_facts: no
  name: common settings
  roles:
    - common

- hosts: lamp
  gather_facts: no
  name: ansible-all
  roles:
    - apache2
    - mariadb
    - php

- hosts: apache2
  gather_facts: no
  name: ansible-apache2
  roles:
    - apache2

- hosts: mariadb
  gather_facts: no
  name: ansible-mariadb
  roles:
    - mariadb

- hosts: php
  gather_facts: no
  name: ansible-php
  roles:
- php次にchrony.confを/etc/ansible/roles/common/filesにコピーします。
cp /vagrant_data/chrony.conf /etc/ansible/roles/common/files次にphp.iniを/etc/ansible/roles/php/filesにコピーします。
cp /vagrant_data/php.ini /etc/ansible/roles/php/files次にvi /etc/ansible/roles/common/tasks/main.ymlで共通の設定を作成
- name: apt install
  apt:
    name:
      - language-pack-ja
      - chrony
      - ufw

- name: set locale
  shell: "localectl set-locale LANG=ja_JP.UTF-8 LANGUAGE=\"ja_JP:ja\""

- name: configure locale
  shell: update-locale LANG=ja_JP.UTF-8

- name: set timezone
  timezone:
    name: Asia/Tokyo

- name: copy chrony.conf
  copy:
    src: ../files/chrony.conf
    dest: /etc/chrony

- name: enable ufw
  ufw:
    state: enabled
    policy: deny

- name: ufw - allow all access to tcp port 22
  ufw:
    rule: allow
    port: '22'
proto: tcp次にvi /etc/ansible/roles/apache2/tasks/main.ymlでwebサーバーの設定を作成します。
- name: apt install
  apt:
    name:
      - apache2

- name: change owner and mode
  file:
    path: /var/www/
    state: directory
    recurse: yes
    group: vagrant
    owner: vagrant
    mode: 0755

- name: restart apache
  service:
    name: apache2
    state: restarted
    enabled: yes

- name: UFW - Allow all access to tcp port 80
  ufw:
    rule: allow
    port: '80'
proto: tcp次にvi /etc/ansible/roles/mariadb/vars/main.ymlでdbサーバー用の変数の設定を作成します。
db_name: hogehoge
db_user_name: fugafuga
db_user_password: P@ssw0rd次にvi /etc/ansible/roles/mariadb/tasks/main.ymlでdbサーバーの設定を作成します。
- name: apt install
  apt:
    name:
      - mariadb-server
      - mariadb-client
      - python3-pip

- name: upgrade pip
  shell: update-alternatives --install /usr/bin/python python /usr/bin/python3.8 0

- name: Install python package
  when: not ansible_check_mode
  ansible.builtin.pip:
    name: PyMySQL

- name: Create Database
  when: not ansible_check_mode
  mysql_db:
    login_unix_socket: /var/run/mysqld/mysqld.sock
    login_user: root
    login_password: ""
    name: "{{ db_name }}"
    state: present
    encoding: utf8mb4
    collation: utf8mb4_general_ci

- name: Create Database User
  when: not ansible_check_mode
  mysql_user:
    login_unix_socket: /var/run/mysqld/mysqld.sock
    login_user: root
    login_password: ""
    name: "{{ db_user_name }}"
    password: "{{ db_user_password }}"
    host: "localhost"
    priv: "{{ db_name }}.*:ALL,GRANT"
    state: present

- name: restart mariadb
  service:
    name: mariadb
    state: restarted
enabled: yes最後にvi /etc/ansible/roles/php/tasks/main.ymlでapサーバーの設定を作成します。
- name: apt install
  apt:
    name:
      - php
      - php-mysql

- name: copy php.ini
  copy:
    src: ../files/php.ini
dest: /etc/php/7.4/apache2/php.iniansibleのplaybookの作成が完了すると/etc/ansibleのディレクトリ構成が以下の通りになります。
.
├── ansible.cfg
├── hosts
├── roles
│   ├── apache2
│   │   └── tasks
│   │       └── main.yml
│   ├── common
│   │   ├── files
│   │   │   └── chrony.conf
│   │   └── tasks
│   │       └── main.yml
│   ├── mariadb
│   │   ├── tasks
│   │   │   └── main.yml
│   │   └── vars
│   │       └── main.yml
│   └── php
│       ├── files
│       │   └── php.ini
│       └── tasks
│           └── main.yml
└── site.yml
4. playbookを実行
ファイルの作成完了後に以下コマンドでplaybookをテストし、問題無ければ実行します。
cd /etc/ansible
ansible-playbook site.yml --check
ansible-playbook site.yml
5. ansible_specを導入
以下コマンドでansible_specの初期設定を実施します。
apt -y install g++ ruby-full make
gem install rake ansible_spec ed25519 bcrypt_pbkdf
cd /etc/ansible
ansiblespec-init
mkdir /etc/ansible/roles/common/spec
mkdir /etc/ansible/roles/apache2/spec
mkdir /etc/ansible/roles/mariadb/spec
mkdir /etc/ansible/roles/php/spec
コマンド実行後は以下のディレクトリ構成になります。
.
├── Rakefile
├── ansible.cfg
├── hosts
├── roles
│   ├── apache2
│   │   ├── spec
│   │   └── tasks
│   │       └── main.yml
│   ├── common
│   │   ├── files
│   │   │   └── chrony.conf
│   │   ├── spec
│   │   └── tasks
│   │       └── main.yml
│   ├── mariadb
│   │   ├── spec
│   │   ├── tasks
│   │   │   └── main.yml
│   │   └── vars
│   │       └── main.yml
│   └── php
│       ├── files
│       │   └── php.ini
│       ├── spec
│       └── tasks
│           └── main.yml
├── site.yml
└── spec
    └── spec_helper.rb
6. テストコード作成
serverspecでテストコードを作成する場合はファイル名の末尾を_spec.rbにする必要があります。
まずvi /etc/ansible/roles/common/spec/package_spec.rbでサーバー共通のパッケージがインストールされていることを確認するテストを作成します。
require 'spec_helper'

%w{language-pack-ja ufw}.each do |pkg|
  describe package(pkg) do
    it { should be_installed }
  end
end次にvi /etc/ansible/roles/common/spec/service_spec.rbでサーバー共通のサービスの自動起動が有効化されていることと起動されていることを確認するテストを作成します。
require 'spec_helper'

%w{chrony ufw}.each do |svc|
  describe service(svc) do
    it { should be_enabled }
  end
end

%w{chrony ufw}.each do |svc|
  describe service(svc) do
    it { should be_running }
  end
end次にvi /etc/ansible/roles/common/spec/systemconf_spec.rbでサーバー共通の基本設定や疎通確認をするテストを作成します。
require 'spec_helper'

describe command('cat /etc/os-release') do
  its(:stdout) { should match /Ubuntu 20\.04\.5 LTS/ }
end

describe command('cat /proc/version') do
  its(:stdout) { should match /Linux version 5\.4/ }
end

describe command('uname -m') do
  its(:stdout) { should match /x86_64/ }
end

describe command('cat /proc/cpuinfo') do
  its(:stdout) { should match /Intel/ }
end

describe command('ip a') do
  its(:stdout) { should match /192\.168\.56\.(21|22)/ }
end

describe default_gateway do
  its(:ipaddress) { should eq '10.0.2.2' }
end

describe host('www.cisco.com') do
  it { should be_reachable }
end

describe host('serverspec.org') do
  it { should be_resolvable }
end

describe command('localectl') do
  its(:stdout) { should match /System Locale: LANG=ja_JP\.UTF-8/ }
end

describe command('timedatectl') do
  its(:stdout) { should match /Time zone: Asia\/Tokyo \(JST, \+0900\)/ }
end

describe file('/etc/chrony/chrony.conf') do
  its(:content) { should match /ntp\.nict\.jp/ }
  its(:content) { should match /jst\.mfeed\.ad\.jp/ }
end

describe command 'ufw status verbose' do
  its(:stdout) { should include 'Default: deny (incoming), allow (outgoing), disabled (routed)' }
  describe 'ssh' do
    its(:stdout) { should match /22\/tcp/ }
  end
end次にvi /etc/ansible/roles/apache2/spec/apache2ufw_spec.rbでファイアウォールのwebサーバーのポートが空いているか確認するテストを作成します。
require 'spec_helper'

describe command 'ufw status verbose' do
  describe 'apache2' do
    its(:stdout) { should match /80\/tcp/ }
  end
end次にvi /etc/ansible/roles/apache2/spec/package_spec.rbでwebサーバーのパッケージがインストールされていることを確認するテストを作成します。
require 'spec_helper'

describe package('apache2') do
  it { should be_installed }
end次にvi /etc/ansible/roles/apache2/spec/service_spec.rbでwebサーバーのサービスの自動起動が有効化されていることと起動されていることを確認するテストを作成します。
require 'spec_helper'

describe service('apache2') do
  it { should be_enabled }
end

describe service('apache2') do
  it { should be_running }
end次にvi /etc/ansible/roles/mariadb/spec/package_spec.rbでdbサーバーのパッケージがインストールされていることを確認するテストを作成します。
require 'spec_helper'

%w{mariadb-server mariadb-client python3-pip}.each do |pkg|
  describe package(pkg) do
    it { should be_installed }
  end
end

describe package('PyMySQL') do
  it { should be_installed.by('pip') }
end次にvi /etc/ansible/roles/mariadb/spec/service_spec.rbでdbサーバーのサービスの自動起動が有効化されていることと起動されていることを確認するテストを作成します。
require 'spec_helper'

describe service('mariadb') do
  it { should be_enabled }
end

describe service('mariadb') do
  it { should be_running }
end最後にvi /etc/ansible/roles/php/spec/package_spec.rbapサーバーのパッケージがインストールされていることを確認するテストを作成します。
require 'spec_helper'

%w{php php-mysql}.each do |pkg|
  describe package(pkg) do
    it { should be_installed }
  end
endテストコードの作成が完了し、/etc/ansibleが以下ディレクトリ構成になれば完成です。
.
├── Rakefile
├── ansible.cfg
├── hosts
├── roles
│   ├── apache2
│   │   ├── spec
│   │   │   ├── apache2ufw_spec.rb
│   │   │   ├── package_spec.rb
│   │   │   └── service_spec.rb
│   │   └── tasks
│   │       └── main.yml
│   ├── common
│   │   ├── files
│   │   │   └── chrony.conf
│   │   ├── spec
│   │   │   ├── package_spec.rb
│   │   │   ├── service_spec.rb
│   │   │   └── systemconf_spec.rb
│   │   └── tasks
│   │       └── main.yml
│   ├── mariadb
│   │   ├── spec
│   │   │   ├── package_spec.rb
│   │   │   └── service_spec.rb
│   │   ├── tasks
│   │   │   └── main.yml
│   │   └── vars
│   │       └── main.yml
│   └── php
│       ├── files
│       │   └── php.ini
│       ├── spec
│       │   └── package_spec.rb
│       └── tasks
│           └── main.yml
├── site.yml
└── spec
    └── spec_helper.rb
7. ansible_spec実行
ファイルの作成完了後に以下コマンドでansible_specを実行します。
rake -T
rake all
ansible_specのテストコードでエラーが出力されなければ構築完了です。
※補足ですが、rake -Tで表示されるrake serverspec:ansible-apache2や
rake serverspec:ansible-mariadbやrake serverspec:ansible-phpのコマンドを実行するとapache2
単体やmariadb単体でテストすることも可能です。以下コマンドでphp確認用の/var/www/html/index.php
を作成します。
sudo su -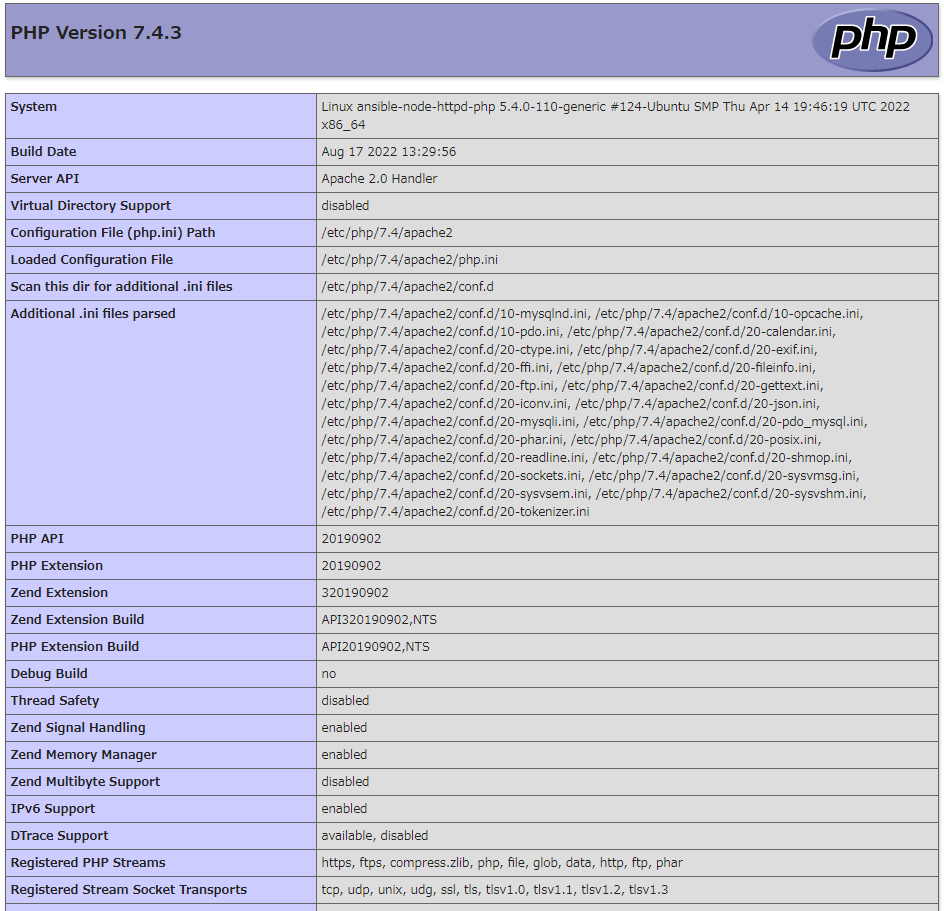
echo "<?php phpinfo(); ?>" >> /var/www/html/index.phpホストOS側でhttp://localhost:8080/index.phpにアクセスし、以下画面が表示されることを確認し、webサーバーとapサーバーの構築が完了していることを確認します。
dbサーバーの構築が完了していることを確認します。
vagrant@ansible-node-mariadb:~$ ps aux | grep mysqld
mysql      55009  0.2  3.8 1710488 78652 ?       Ssl  17:05   0:02 /usr/sbin/mysqld
改善点
実際に運用する際はOS・バージョンによる分岐や設定済みのファイルを用意する等を実施することで、より汎用的で使いやすくすることが可能です。
phpとmysqlを設定する場合はphpのリソースタイプやmysqlのリソースタイプをテストコードで利用した方が良いと思います。
所感
rubyを書いたことがほとんど無かったため、期待結果の書き方等様々な箇所で詰まりました。
例えばリソースタイプで正規表現で書けない部分があったので、別のリソースタイプを使って無理やり書いたりしています。
rubyを書ける人は期待結果の書き方を変更したり、ansible_specの設定ファイルを変更する等してみてください。
今回vagrantやchefやserverspecとrubyだけで様々なツールを扱えるため、rubyを学習することは非常に重要だと学びました。
ちなみに構成管理のテスト自動化ツールはserverspec以外でgoのgossやpythonのTestinfraが存在します。
今回ansible_specを扱いましたが、serverspec単体でも使えそうですし、awspecでawsのテストも可能と幅広く扱えるため興味を持った方はぜひ試してみてください。