お久しぶりです。インフラソリューション部の”のなか”です。
今回は、AWS上で稼働している既存WordPressを更新する際にかかっているデプロイ時間を30分から5分に圧縮した話をしていきます。
インフラの管理やサーバーの設定等の様々な技術を使用して説明するため、前編と後編に分けて書いていきます。
最終的にはWordPressを自動でデプロイし、最新のAMIが作成され、Auto Scaling Group(以降ASG)の起動テンプレートのAMIが自動で更新されるようになります。
それではWordPressのデプロイ自動化の前編を始めていきましょう!
開発環境
– Terraform 1.3.3
– OS(WSL2):Ubuntu 20.04.5 LTS
– Ansible
– OS(EC2):Amazon Linux 2
– MW:Nginx 1.22.1
– MW:MariaDB 10.5.10
– MW:PHP-FPM 7.4.33
– ソフトウェア:WordPress 5.7.8
最終的に構築するシステム
前編に入る前に前編後編合わせた自動デプロイシステム全体の構成について説明します。
本ブログの目的は以下の自動デプロイシステムを構築することになります。
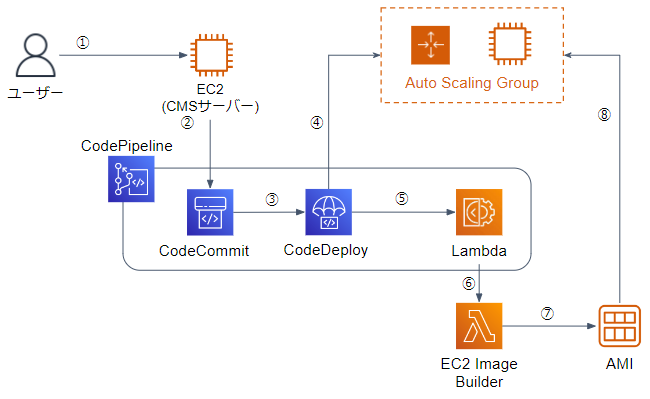
自動デプロイシステムは以下流れで処理されます。
①WordPressをGUI上で設定を変更し、EC2にSSH接続
②CodeCommitにWordPressのソースコードをpush
③CodePipelineを起動し、Sourceステージを開始し、Deployステージに遷移
④DeployステージでCodeDeployを使用してASGにWordPressをデプロイ
⑤InvokeステージでLambdaを実行
⑥InvokeステージでEC2 Image Builderを呼び出す
⑦EC2 Image BuilderでAMIを作成
⑧ASGの起動テンプレートのAMIを自動更新
詳細は後編で説明しますが、自動デプロイシステムにはデプロイ後のAMI作成に時間がかかるという欠点とデプロイする度にAMIが作成されていく欠点があります。
先に改善案を書いておきますと、インスタンスのテストが不要であれば⑤~⑧を削除し、AWS Backupを使用する構成に変更する方が良いと思います。
自動デプロイシステムの構成図は以下の通りになります。

全体の説明についてはこれで終了し、前編の説明に入っていきます。
注意点
– Ansibleはこちらの記事とこちらの記事で説明しているため省略
– Terraformでリソース作成のためにアクセスキーを使用していますが、スイッチロールを使用するのがベストプラクティス
– VPC等のAWSの基本リソースに関して詳細な説明は省略
– バージョン等の環境による実行結果に差異がある
前提条件
– WSL2にaws cliのバージョン2.8.12とTerraformのバージョン1.3.3をインストール済み
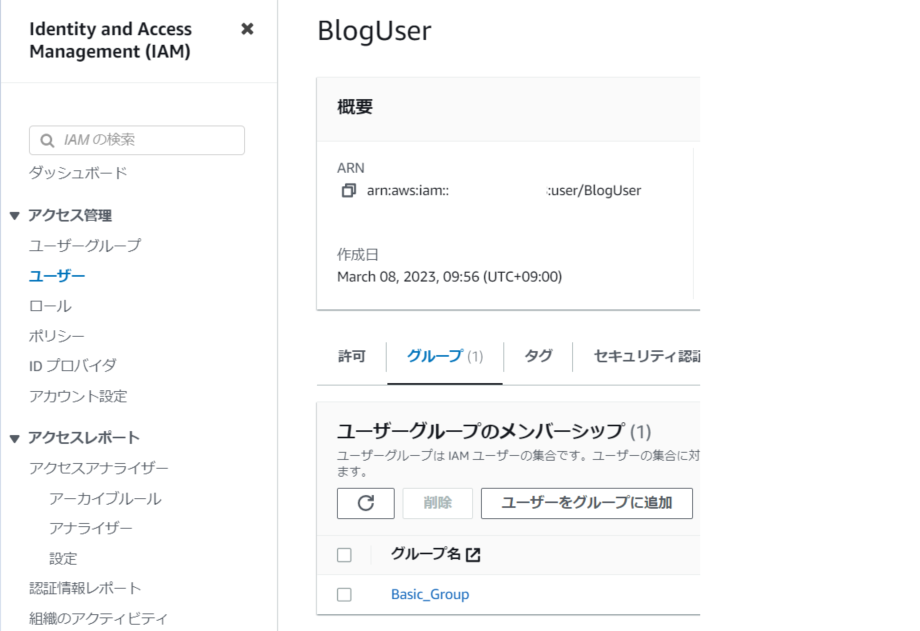
– AWSのアカウントと作業用ユーザーのBlogUserを作成済み
– BlogUserでアクセスキーとシークレットアクセスキーを作成済み
– BlogUserに以下権限をアタッチ済み
– IAMFullAccess
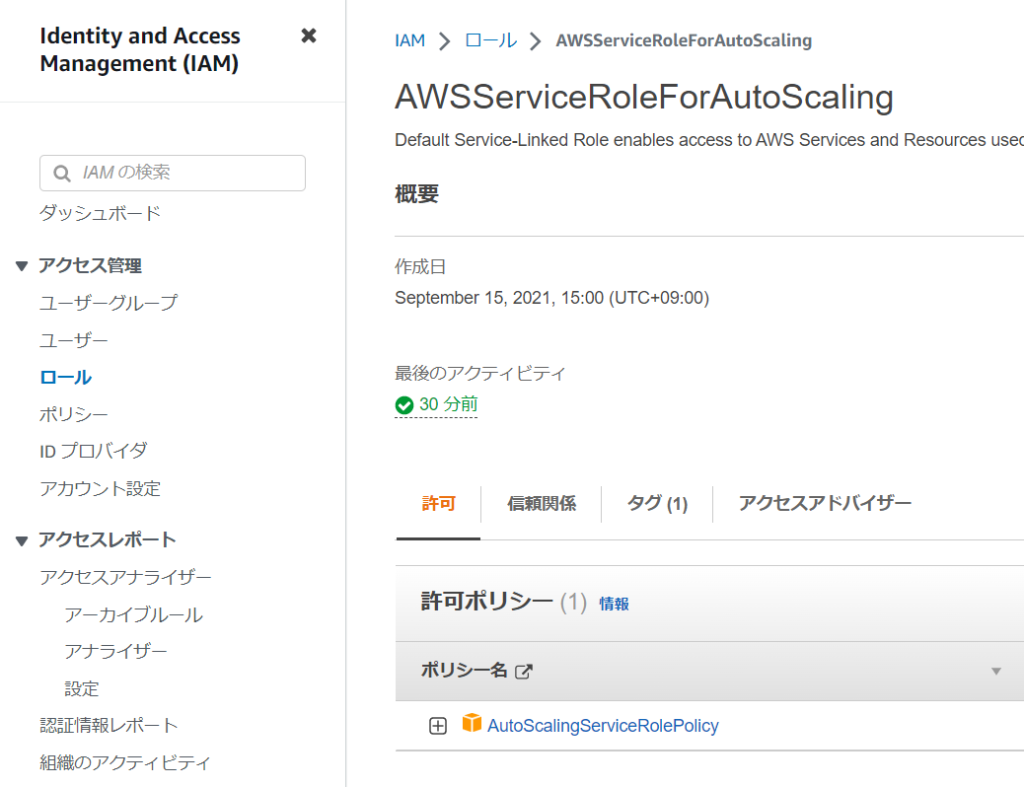
– 以下ポリシーをアタッチしたIAMロールのROLE_BLOGを作成済み
– AmazonEC2FullAccess
– AmazonSSMFullAccess
– SSMのクイックセットアップを実施済み
– EC2にアクセスするためのキーペアを作成済み
用語説明
Terraformとは
まず初めにTerraformについて説明します。
Terraformとは[公式ドキュメントで以下のように説明されています。
HashiCorp Terraform is an infrastructure as code tool
that lets you define both cloud and on-prem resources
in human-readable configuration files that you can version, reuse, and share.
You can then use a consistent workflow to provision and manage
all of your infrastructure throughout its lifecycle.
Terraform can manage low-level components like compute, storage, and networking resources,
as well as high-level components like DNS entries and SaaS features.
説明を1行でまとめるとクラウドやオンプレミスのリソースを設定ファイルで定義するIaCツールで、インフラのプロビジョニングや管理が可能です。
今回はほぼ全てのAWSのリソースをTerraformで管理していきます。
WP-CLIとは
次にWP-CLIについて説明します。
WP-CLIは公式ドキュメントで以下のように説明されています。
WP-CLI は WordPress を管理するためのコマンドラインインターフェースです。
プラグインのアップデートやマルチサイトのセットアップなど、多くのことをブラウザなしで実行できます。
以上の説明からも分かりますが、WP-CLIはWordPress自体のアップデートやプラグインのインストール、テーマのインストール等がコマンドで操作可能なツールです。
前編のリソース作成手順
手順
1. Terraformで各リソースを作成し、AnsibleでWP-CLIを使用してWordPressを構築
2. 構築したサーバーからAMIを作成
3. 作成したAMIから起動テンプレートを作成し、ASGを作成
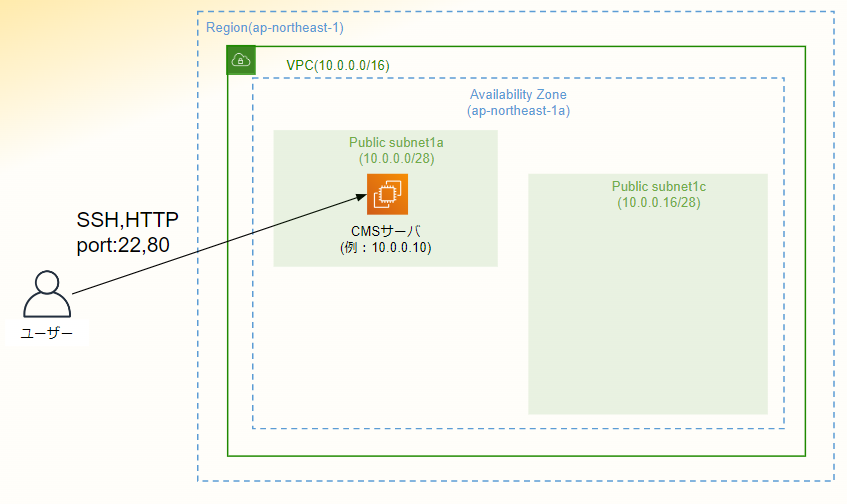
前編の構成図と使用するAWSのリソース
構成図
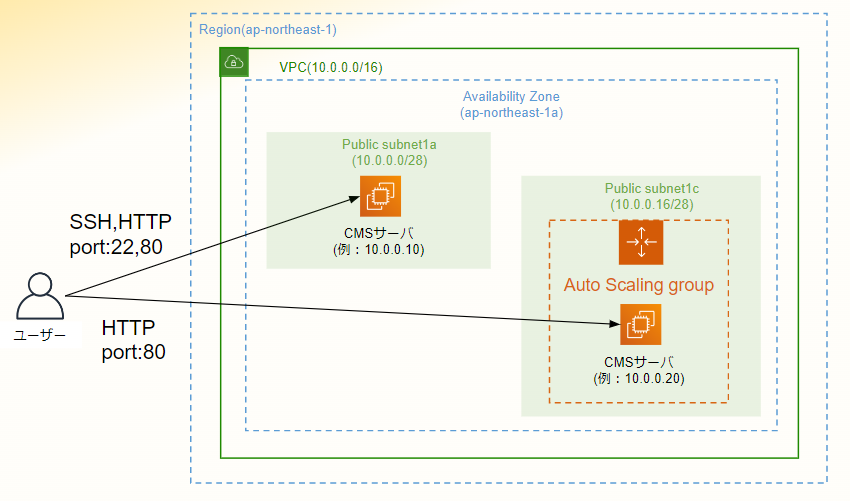
使用するAWSのリソース
– IAM
– VPC
– EC2
– SSM
前編でのディレクトリ構成
Terraform
前編の`~/terraform-blog`は以下のディレクトリ構成になります。
.
├── .terraform
│   └── providers
│       └── registry.terraform.io
│           └── hashicorp
│               └── aws
│                   └── 4.57.1
│                       └── linux_amd64
│                           └── terraform-provider-aws_v4.57.1_x5
├── .terraform.lock.hcl
├── aws_asg.tf
├── aws_data.tf
├── aws_ec2.tf
├── aws_iam.tf
├── aws_vpc.tf
├── provider.tf
├── terraform.tfstate
└── terraform.tfstate.backup
Ansible
前編の`/etc/ansible`は以下のディレクトリ構成になります。
.
├── ansible.cfg
├── hosts
├── roles
│   ├── common
│   │   ├── files
│   │   │   └── chrony.conf
│   │   └── tasks
│   │       └── main.yml
│   ├── mariadb
│   │   ├── tasks
│   │   │   └── main.yml
│   │   └── vars
│   │       └── main.yml
│   ├── nginx
│   │   ├── files
│   │   │   └── nginx.conf
│   │   └── tasks
│   │       └── main.yml
│   ├── php
│   │   ├── files
│   │   │   └── www.conf
│   │   └── tasks
│   │       └── main.yml
│   └── wp
│       ├── tasks
│       │   └── main.yml
│       └── vars
│           └── main.yml
└── site.yml
構築
IAMを設定
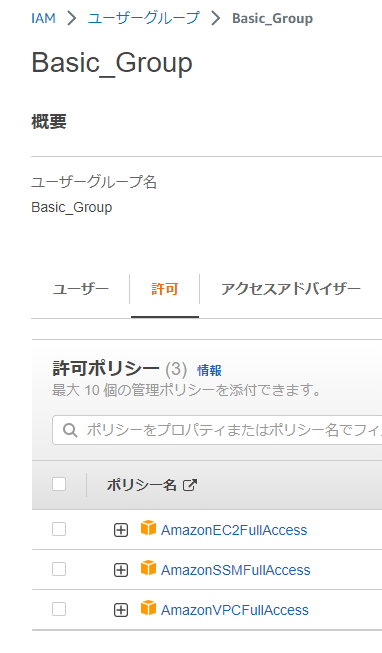
1. AWSのコンソールにサインインし、BlogUserに以下ポリシーをアタッチしたBasic_Groupユーザーグループを作成
– AmazonEC2FullAccess
– AmazonSSMFullAccess
– AmazonVPCFullAccess
2. 作成したBasic_GroupをBlogUserに追加
3. ASG用のサービスロールを作成
TerraformでIAMを管理
1. `vi ~/.aws/credentials`でアクセスキーとシークレットアクセスキーを設定
```~/.aws/credentials
[BlogUser]
aws_access_key_id = "ここにアクセスキーを記載"
aws_secret_access_key = "ここにシークレットアクセスキーを記載"
```
2. WSL2に各リソースを作成するための作業用ディレクトリを作成
sudo apt -y update
mkdir ~/terraform-blog
cd ~/terraform-blog
3. `vi provider.tf`でプロバイダー情報を設定
– provider:AWS Provider
provider "aws" {
  region  = "ap-northeast-1"
  profile = "BlogUser"
}
4. `vi aws_data.tf`で外部参照をするためのデータを設定
Terraformのaws_iam_policy_documentはData Source: aws_iam_policy_documentを確認してください。
#----------------------------------------
# IAMポリシーを定義
#----------------------------------------
data "aws_iam_policy_document" "allow_asg" {
  statement {
    sid    = "EC2InstanceManagement"
    effect = "Allow"
    actions = [
      "ec2:AttachClassicLinkVpc",
      "ec2:CancelSpotInstanceRequests",
      "ec2:CreateFleet",
      "ec2:CreateTags",
      "ec2:DeleteTags",
      "ec2:Describe*",
      "ec2:DetachClassicLinkVpc",
      "ec2:ModifyInstanceAttribute",
      "ec2:RequestSpotInstances",
      "ec2:RunInstances",
      "ec2:StartInstances",
      "ec2:StopInstances",
      "ec2:TerminateInstances"
    ]
    resources = ["*"]
  }
  statement {
    sid    = "EC2InstanceProfileManagement"
    effect = "Allow"
    actions = [
      "iam:PassRole"
    ]
    resources = ["*"]
  }
  statement {
    sid    = "EC2SpotManagement"
    effect = "Allow"
    actions = [
      "iam:CreateServiceLinkedRole"
    ]
    resources = ["*"]
  }
  statement {
    sid    = "ELBManagement"
    effect = "Allow"
    actions = [
      "elasticloadbalancing:Register*",
      "elasticloadbalancing:Deregister*",
      "elasticloadbalancing:Describe*"
    ]
    resources = ["*"]
  }
  statement {
    sid    = "CWManagement"
    effect = "Allow"
    actions = [
      "cloudwatch:DeleteAlarms",
      "cloudwatch:DescribeAlarms",
      "cloudwatch:GetMetricData",
      "cloudwatch:PutMetricAlarm"
    ]
    resources = ["*"]
  }
  statement {
    sid    = "SNSManagement"
    effect = "Allow"
    actions = [
      "sns:Publish"
    ]
    resources = ["*"]
  }
  statement {
    sid    = "EventBridgeRuleManagement"
    effect = "Allow"
    actions = [
      "events:PutRule",
      "events:PutTargets",
      "events:RemoveTargets",
      "events:DeleteRule",
      "events:DescribeRule"
    ]
    resources = ["*"]
  }
  statement {
    sid    = "SystemsManagerParameterManagement"
    effect = "Allow"
    actions = [
      "ssm:GetParameters"
    ]
    resources = ["*"]
  }
  statement {
    sid    = "VpcLatticeManagement"
    effect = "Allow"
    actions = [
      "vpc-lattice:DeregisterTargets",
      "vpc-lattice:GetTargetGroup",
      "vpc-lattice:ListTargets",
      "vpc-lattice:ListTargetGroups",
      "vpc-lattice:RegisterTargets"
    ]
    resources = ["*"]
  }
}
5. `vi aws_iam.tf`でIAMのロールとサービスロールを設定
– IAMユーザー:Resource: aws_iam_user
– IAMポリシー:Resource: aws_iam_policy
– IAMロール:Resource: aws_iam_role
#----------------------------------------
# IAMユーザーを作成
#----------------------------------------
resource "aws_iam_user" "BlogUser" {
  name = "BlogUser"
  path = "/"
}

#----------------------------------------
# IAMポリシーを作成
#----------------------------------------
resource "aws_iam_policy" "AutoScalingServiceRolePolicy" {
  name   = "AutoScalingServiceRolePolicy"
  policy = data.aws_iam_policy_document.allow_asg.json
}

#----------------------------------------
# IAMロールを作成
#----------------------------------------
resource "aws_iam_role" "ROLE_BLOG" {
  name               = "ROLE_BLOG"
  assume_role_policy = "{\"Statement\":[{\"Action\":\"sts:AssumeRole\",\"Effect\":\"Allow\",\"Principal\":{\"Service\":\"ec2.amazonaws.com\"}}],\"Version\":\"2012-10-17\"}"
  description        = "Allows EC2 instances to call AWS services on your behalf."
  path               = "/"
  managed_policy_arns = [
    "arn:aws:iam::aws:policy/AmazonEC2FullAccess",
    "arn:aws:iam::aws:policy/AmazonSSMFullAccess",
  ]
  tags = {
    Name = "ROLE_BLOG"
  }
}

#----------------------------------------
# IAMロールを作成
#----------------------------------------
resource "aws_iam_role" "AWSServiceRoleForAutoScaling" {
  name               = "AWSServiceRoleForAutoScaling"
  assume_role_policy = "{\"Statement\":[{\"Action\":\"sts:AssumeRole\",\"Effect\":\"Allow\",\"Principal\":{\"Service\":\"autoscaling.amazonaws.com\"}}],\"Version\":\"2012-10-17\"}"
  description        = "Default Service-Linked Role enables access to AWS Services and Resources used or managed by Auto Scaling"
  path               = "/aws-service-role/autoscaling.amazonaws.com/"
  managed_policy_arns = [
    "arn:aws:iam::aws:policy/aws-service-role/AutoScalingServiceRolePolicy"
  ]
  tags = {
    Name = "AWSServiceRoleForAutoScaling"
  }
}
6. 作成済みのユーザーとロールとサービスロールをインポート
– initコマンド:Command: init
– importコマンド:[Command: import
terraform init
terraform import aws_iam_user.BlogUser BlogUser
terraform import aws_iam_role.ROLE_BLOG ROLE_BLOG
terraform import aws_iam_role.AWSServiceRoleForAutoScaling AWSServiceRoleForAutoScaling
7. IAMを作成して管理
– planコマンドはCommand: plan
– importコマンドはCommand: apply
※以降はTerraformの各コマンドの説明を省略
terraform plan
terraform apply
Terraformでネットワークを構築
1. セキュリティグループを作成するためにGIP
2. `vi aws_vpc.tf`でネットワークを設定
– VPC:Resource: aws_vpc
– サブネット:Resource: aws_subnet
– インターネットゲートウェイ:Resource: aws_internet_gateway
– ルートテーブル:Resource: aws_route_table
– ルートテーブルの紐づけ:Resource: aws_route_table_association
– セキュリティグループ:Resource: aws_security_group
#----------------------------------------
# VPCの作成
#----------------------------------------
resource "aws_vpc" "vpc_blog" {
  cidr_block           = "10.0.0.0/16"
  enable_dns_hostnames = false
  tags = {
    Name = "vpc_blog"
  }
}

#----------------------------------------
# パブリックサブネット1aの作成
#----------------------------------------
resource "aws_subnet" "pub_subnet1a_blog" {
  vpc_id                  = aws_vpc.vpc_blog.id
  cidr_block              = "10.0.0.0/28"
  availability_zone       = "ap-northeast-1a"
  map_public_ip_on_launch = true
  tags = {
    Name = "pub_subnet1a_blog"
  }
}

#----------------------------------------
# パブリックサブネット1cの作成
#----------------------------------------
resource "aws_subnet" "pub_subnet1c_blog" {
  vpc_id                  = aws_vpc.vpc_blog.id
  cidr_block              = "10.0.0.16/28"
  availability_zone       = "ap-northeast-1a"
  map_public_ip_on_launch = true
  tags = {
    Name = "pub_subnet1c_blog"
  }
}

#----------------------------------------
# インターネットゲートウェイの作成
#----------------------------------------
resource "aws_internet_gateway" "igw_blog" {
  vpc_id = aws_vpc.vpc_blog.id

  tags = {
    Name = "igw_blog"
  }
}

#----------------------------------------
# ルートテーブルの作成
#----------------------------------------
resource "aws_route_table" "rtb_blog" {
  vpc_id = aws_vpc.vpc_blog.id
  route {
    cidr_block = "0.0.0.0/0"
    gateway_id = aws_internet_gateway.igw_blog.id
  }

  tags = {
    Name = "rtb_blog"
  }
}

#----------------------------------------
# パブリックサブネット1aにルートテーブルを紐づけ
#----------------------------------------
resource "aws_route_table_association" "rt_assoc_1a" {
  subnet_id      = aws_subnet.pub_subnet1a_blog.id
  route_table_id = aws_route_table.rtb_blog.id
}

#----------------------------------------
# パブリックサブネット1cにルートテーブルを紐づけ
#----------------------------------------
resource "aws_route_table_association" "rt_assoc_1c" {
  subnet_id      = aws_subnet.pub_subnet1c_blog.id
  route_table_id = aws_route_table.rtb_blog.id
}

#----------------------------------------
# セキュリティグループの作成
#----------------------------------------
resource "aws_security_group" "sg_blog" {
  name   = "sg_blog"
  vpc_id = aws_vpc.vpc_blog.id
  ingress {
    from_port   = 22
    to_port     = 22
    protocol    = "tcp"
    cidr_blocks = ["(調べたGIPをここに記載)/32"]
  }
  ingress {
    from_port   = 80
    to_port     = 80
    protocol    = "tcp"
    cidr_blocks = ["(調べたGIPをここに記載)/32"]
  }
  egress {
    from_port   = 0
    to_port     = 0
    protocol    = "-1"
    cidr_blocks = ["0.0.0.0/0"]
  }
  tags = {
    Name = "sg_blog"
  }
}
3. ネットワークを構築して管理
terraform plan
terraform apply
4. 構成図のネットワークが構築されたことを確認

Terraformでサーバーを構築
1. `vi aws_ec2.tf`でサーバーを設定
– EC2:Resource: aws_instance
#----------------------------------------
# EC2インスタンスを作成
#----------------------------------------
resource "aws_instance" "blog_wp01" {
  ami                    = "ami-0329eac6c5240c99d"
  instance_type          = "t2.micro"
  subnet_id              = aws_subnet.pub_subnet1a_blog.id
  key_name               = "(作成済みのキーペア名をここに記載)"
  vpc_security_group_ids = [aws_security_group.sg_blog.id]
  private_ip             = "10.0.0.10"
  iam_instance_profile   = "ROLE_BLOG"
  tags = {
    Name   = "blog_wp01"
    System = "blog"
  }
}
2. サーバーを構築して管理
terraform plan
terraform apply
3. 構成図のサーバーが構築されていることを確認
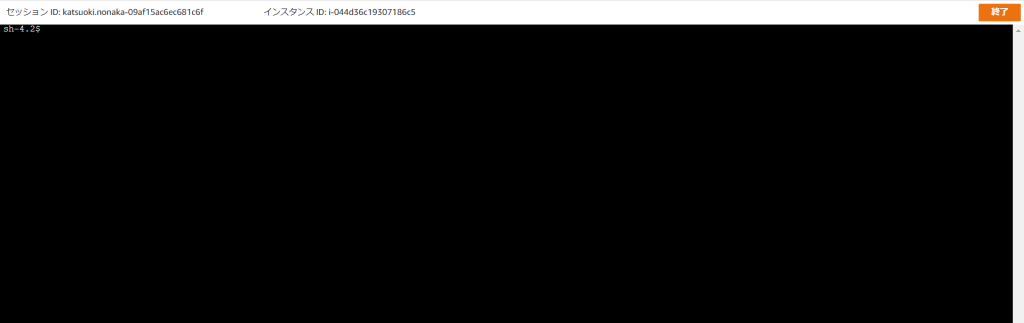
4. サーバーにセッションマネージャーで接続出来ることを確認
※接続出来ない場合は前提条件にある[SSMのクイックセットアップが実施済み](#前提条件)か確認してください。
AnsibleでWordPressを構築
1. 構築したサーバーにSSHし、以下コマンドでサーバーをアップデートし、パッケージ等をインストール
sudo yum -y update
sudo su -
amazon-linux-extras install -y ansible2
ansible-galaxy collection install community.mysql
2. Ansibleのディレクトリを作成
cd /etc/ansible
mkdir -p roles/common/files
mkdir roles/common/tasks
mkdir -p roles/nginx/files
mkdir roles/nginx/tasks
mkdir -p roles/mariadb/vars
mkdir roles/mariadb/tasks
mkdir -p roles/php/files
mkdir roles/php/tasks
mkdir -p roles/wp/vars
mkdir roles/wp/tasks
3. playbookをローカル実行する設定をhostsファイルに追記
echo [all] >> hosts
echo localhost ansible_connection=local >> hosts
4. `vi site.yml`で各playbookを呼び出すplaybookを作成
- hosts: all
  become: yes
  gather_facts: no
  name: common settings
  roles:
    - common
    - nginx
    - mariadb
    - php
    - wp
5. `vi roles/common/files/chrony.conf`で時刻の設定ファイルを作成
# Use NTP servers from DHCP.
sourcedir /run/chrony-dhcp

# Include configuration found in /etc/chrony.d/*.conf
confdir /etc/chrony.d

# Use NTP sources found in /etc/chrony.d/*.sources
sourcedir /etc/chrony.d

# Record the rate at which the system clock gains/losses time.
driftfile /var/lib/chrony/drift

# Allow the system clock to be stepped in the first three updates
# if its offset is larger than 1 second.
makestep 1.0 3

# Enable kernel synchronization of the real-time clock (RTC).
rtcsync

# Specify file containing keys for NTP authentication.
keyfile /etc/chrony.keys

# Specify directory for log files.
logdir /var/log/chrony

# Select which information is logged.
log measurements statistics tracking

server 0.jp.pool.ntp.org iburst
server 1.jp.pool.ntp.org iburst
server 2.jp.pool.ntp.org iburst
server 3.jp.pool.ntp.org iburst
6. `vi roles/nginx/files/nginx.conf`でWEBサーバーの設定ファイルを作成
# For more information on configuration, see:
#   * Official English Documentation: http://nginx.org/en/docs/
#   * Official Russian Documentation: http://nginx.org/ru/docs/

user nginx;
worker_processes auto;
error_log /var/log/nginx/error.log;
pid /run/nginx.pid;

# Load dynamic modules. See /usr/share/doc/nginx/README.dynamic.
include /usr/share/nginx/modules/*.conf;

events {
    worker_connections 1024;
}

http {
    log_format  main  '$remote_addr - $remote_user [$time_local] "$request" '
                      '$status $body_bytes_sent "$http_referer" '
                      '"$http_user_agent" "$http_x_forwarded_for"';

    access_log  /var/log/nginx/access.log  main;

    sendfile            on;
    tcp_nopush          on;
    tcp_nodelay         on;
    keepalive_timeout   65;
    types_hash_max_size 4096;

    include             /etc/nginx/mime.types;
    default_type        application/octet-stream;

    # Load modular configuration files from the /etc/nginx/conf.d directory.
    # See http://nginx.org/en/docs/ngx_core_module.html#include
    # for more information.
    include /etc/nginx/conf.d/*.conf;

    server {
        listen       80;
        listen       [::]:80;
        server_name  _;
        #root         /usr/share/nginx/html;
        root         /var/www/html;

        # Load configuration files for the default server block.
        include /etc/nginx/default.d/*.conf;

        error_page 404 /404.html;
        location = /404.html {
        }

        error_page 500 502 503 504 /50x.html;
        location = /50x.html {
        }
    }
}
7. `vi roles/php/files/www.conf`でphp-fpmの設定ファイルを作成
; Start a new pool named 'www'.
; the variable $pool can we used in any directive and will be replaced by the
; pool name ('www' here)
[www]

; Unix user/group of processes
; Note: The user is mandatory. If the group is not set, the default user's group
;       will be used.
; RPM: apache user chosen to provide access to the same directories as httpd
;user = apache
user = nginx
; RPM: Keep a group allowed to write in log dir.
;group = apache
group = nginx

; The address on which to accept FastCGI requests.
; Valid syntaxes are:
;   'ip.add.re.ss:port'    - to listen on a TCP socket to a specific IPv4 address on
;                            a specific port;
;   '[ip:6:addr:ess]:port' - to listen on a TCP socket to a specific IPv6 address on
;                            a specific port;
;   'port'                 - to listen on a TCP socket to all addresses
;                            (IPv6 and IPv4-mapped) on a specific port;
;   '/path/to/unix/socket' - to listen on a unix socket.
; Note: This value is mandatory.
listen = /run/php-fpm/www.sock

; Set permissions for unix socket, if one is used. In Linux, read/write
; permissions must be set in order to allow connections from a web server.
; Default Values: user and group are set as the running user
;                 mode is set to 0660
;listen.owner = nobody
listen.owner = nginx
;listen.group = nobody
listen.group = nginx
;listen.mode = 0660

; When POSIX Access Control Lists are supported you can set them using
; these options, value is a comma separated list of user/group names.
; When set, listen.owner and listen.group are ignored
listen.acl_users = apache,nginx
;listen.acl_groups =

; List of addresses (IPv4/IPv6) of FastCGI clients which are allowed to connect.
; Equivalent to the FCGI_WEB_SERVER_ADDRS environment variable in the original
; PHP FCGI (5.2.2+). Makes sense only with a tcp listening socket. Each address
; must be separated by a comma. If this value is left blank, connections will be
; accepted from any ip address.
; Default Value: any
listen.allowed_clients = 127.0.0.1

; Choose how the process manager will control the number of child processes.
; Possible Values:
;   static  - a fixed number (pm.max_children) of child processes;
;   dynamic - the number of child processes are set dynamically based on the
;             following directives. With this process management, there will be
;             always at least 1 children.
;             pm.max_children      - the maximum number of children that can
;                                    be alive at the same time.
;             pm.start_servers     - the number of children created on startup.
;             pm.min_spare_servers - the minimum number of children in 'idle'
;                                    state (waiting to process). If the number
;                                    of 'idle' processes is less than this
;                                    number then some children will be created.
;             pm.max_spare_servers - the maximum number of children in 'idle'
;                                    state (waiting to process). If the number
;                                    of 'idle' processes is greater than this
;                                    number then some children will be killed.
;  ondemand - no children are created at startup. Children will be forked when
;             new requests will connect. The following parameter are used:
;             pm.max_children           - the maximum number of children that
;                                         can be alive at the same time.
;             pm.process_idle_timeout   - The number of seconds after which
;                                         an idle process will be killed.
; Note: This value is mandatory.
pm = dynamic

; The number of child processes to be created when pm is set to 'static' and the
; maximum number of child processes when pm is set to 'dynamic' or 'ondemand'.
; This value sets the limit on the number of simultaneous requests that will be
; served. Equivalent to the ApacheMaxClients directive with mpm_prefork.
; Equivalent to the PHP_FCGI_CHILDREN environment variable in the original PHP
; CGI. The below defaults are based on a server without much resources. Don't
; forget to tweak pm.* to fit your needs.
; Note: Used when pm is set to 'static', 'dynamic' or 'ondemand'
; Note: This value is mandatory.
pm.max_children = 50

; The number of child processes created on startup.
; Note: Used only when pm is set to 'dynamic'
; Default Value: min_spare_servers + (max_spare_servers - min_spare_servers) / 2
pm.start_servers = 5

; The desired minimum number of idle server processes.
; Note: Used only when pm is set to 'dynamic'
; Note: Mandatory when pm is set to 'dynamic'
pm.min_spare_servers = 5

; The desired maximum number of idle server processes.
; Note: Used only when pm is set to 'dynamic'
; Note: Mandatory when pm is set to 'dynamic'
pm.max_spare_servers = 35

; The log file for slow requests
; Default Value: not set
; Note: slowlog is mandatory if request_slowlog_timeout is set
slowlog = /var/log/php-fpm/www-slow.log

; Default Value: nothing is defined by default except the values in php.ini and
;                specified at startup with the -d argument
;php_admin_value[sendmail_path] = /usr/sbin/sendmail -t -i -f www@my.domain.com
;php_flag[display_errors] = off
php_admin_value[error_log] = /var/log/php-fpm/www-error.log
php_admin_flag[log_errors] = on
;php_admin_value[memory_limit] = 128M

; Set the following data paths to directories owned by the FPM process user.
;
; Do not change the ownership of existing system directories, if the process
; user does not have write permission, create dedicated directories for this
; purpose.
;
; See warning about choosing the location of these directories on your system
; at http://php.net/session.save-path
php_value[session.save_handler] = files
php_value[session.save_path]    = /var/lib/php/session
php_value[soap.wsdl_cache_dir]  = /var/lib/php/wsdlcache
;php_value[opcache.file_cache]  = /var/lib/php/opcache
8. `vi roles/common/tasks/main.yml`で共通の設定を作成
- name: set locale
  shell: "localectl set-locale LANG=ja_JP.UTF-8 LANGUAGE=\"ja_JP:ja\""

- name: set timezone
  timezone:
    name: Asia/Tokyo

- name: copy chrony.conf
  copy:
    src: ../files/chrony.conf
    dest: /etc/chrony
9. `vi roles/nginx/tasks/main.yml`でwebサーバーの設定を作成
- name: Enable amzn2extra-nginx1 repository
  shell: amazon-linux-extras enable nginx1
  changed_when: false

- name: Install Nginx packages from amazon-linux-extras
  when: not ansible_check_mode
  yum:
    name: nginx
    state: present

- name: append nginx group to ec2-user user
  when: not ansible_check_mode
  user:
    name: ec2-user
    append: yes
    groups: ec2-user,nginx

- name: change owner and mode
  file:
    path: /var/www/html
    state: directory
    recurse: yes
    group: nginx
    owner: ec2-user
    mode: 0775

- name: copy nginx
  copy:
    src: ../files/nginx.conf
    dest: /etc/nginx

- name: chown nginx
  when: not ansible_check_mode
  file:
    path: /etc/nginx/nginx.conf
    state: file
    group: root
    owner: root
    mode: 0644

- name: restart nginx
  when: not ansible_check_mode
  service:
    name: nginx
    state: restarted
    enabled: yes
10. `vi roles/mariadb/vars/main.yml`でdbサーバー用の変数の設定を作成
db_name: wordpress-db
db_user_name: wordpress-user
db_user_password: WPWP@123
11. `vi roles/mariadb/tasks/main.yml`でdbサーバーの設定を作成
- name: Enable amzn2extra-mariadb10.5 repository
  when: not ansible_check_mode
  shell: amazon-linux-extras enable mariadb10.5
  changed_when: false

- name: Install MariaDB packages from amazon-linux-extras
  yum:
    name:
      - mariadb
      - MySQL-python
    state: present

- name: install PyMySQL
  pip:
    name: PyMySQL
    executable: pip3

- name: restart mariadb
  when: not ansible_check_mode
  service:
    name: mariadb
    state: restarted
    enabled: yes

- name: Create Database
  when: not ansible_check_mode
  mysql_db:
    login_unix_socket: /var/lib/mysql/mysql.sock
    login_user: root
    login_password: ""
    name: "{{ db_name }}"
    state: present
    encoding: utf8mb4
    collation: utf8mb4_general_ci

- name: Create Database User
  when: not ansible_check_mode
  mysql_user:
    login_unix_socket: /var/lib/mysql/mysql.sock
    login_user: root
    login_password: ""
    name: "{{ db_user_name }}"
    password: "{{ db_user_password }}"
    host: "localhost"
    priv: "{{ db_name }}.*:ALL,GRANT"
    state: present

- name: restart mariadb
  when: not ansible_check_mode
  service:
    name: mariadb
    state: restarted
    enabled: yes
12. `vi roles/php/tasks/main.yml`でapサーバーの設定を作成
- name: Enable amzn2extra-php7.4 repository
  when: not ansible_check_mode
  shell: amazon-linux-extras enable php7.4
  changed_when: false

- name: Install PHP packages from amazon-linux-extras
  yum:
    name:
      - php
      - php-pdo
      - php-mysqlnd
      - php-cli
      - php-json
      - php-gd
      - php-mbstring
      - php-xml
      - php-fpm
    state: present

- name: copy
  copy:
    src: ../files/www.conf
    dest: /etc/php-fpm.d/www.conf

- name: restart php-fpm
  when: not ansible_check_mode
  service:
    name: php-fpm
    state: restarted
    enabled: yes
13. `vi roles/wp/vars/main.yml`でdbサーバー用の変数の設定を作成
db_name: wordpress-db
db_user_name: wordpress-user
db_user_password: WPWP@123
title: blogtest
admin_user: bloguser
admin_password: b10Gb10G
admin_email: blogtest@example.com
14. `vi roles/wp/tasks/main.yml`でapサーバーの設定を作成
- name: Get wp-cli
  get_url:
    url: https://raw.githubusercontent.com/wp-cli/builds/gh-pages/phar/wp-cli.phar
    dest: /usr/local/bin/wp
    mode: 0755

- name: check file index.php
  stat:
    path: /var/www/html/index.php
  register: index_php

- name: wp download
  when: not index_php.stat.exists
  shell: "wp core download --locale=ja --path=/var/www/html --version=5.7.8"

- name: check file wp-config.php
  stat:
    path: /var/www/html/wp-config.php
  register: wpconfig_php

- name: wp config create
  when: not wpconfig_php.stat.exists
  shell: "wp config create --dbname={{ db_name }} --dbuser={{ db_user_name }} --dbpass={{ db_user_password }} --path=/var/www/html"

- name: wp install
  shell: "wp core install --url=http://$(curl inet-ip.info) --title={{ title }} --admin_user={{ admin_user }} --admin_password={{ admin_password }} --admin_email={{ admin_email }} --path=/var/www/html"

- name: restart nginx
  when: not ansible_check_mode
  service:
    name: nginx
    state: restarted
    enabled: yes
15. Ansibleのplaybookの作成が完了した`/etc/ansible`のディレクトリ構成
.
├── ansible.cfg
├── hosts
├── roles
│   ├── common
│   │   ├── files
│   │   │   └── chrony.conf
│   │   └── tasks
│   │       └── main.yml
│   ├── mariadb
│   │   ├── tasks
│   │   │   └── main.yml
│   │   └── vars
│   │       └── main.yml
│   ├── nginx
│   │   ├── files
│   │   │   └── nginx.conf
│   │   └── tasks
│   │       └── main.yml
│   ├── php
│   │   ├── files
│   │   │   └── www.conf
│   │   └── tasks
│   │       └── main.yml
│   └── wp
│       ├── tasks
│       │   └── main.yml
│       └── vars
│           └── main.yml
└── site.yml
playbookを実行
1. playbookのdry runを実行した後、playbookを実行
ansible-playbook site.yml --check
ansible-playbook site.yml
2. 構築したサーバーにwebでアクセスしてWordPressの初期画面が表示されることを確認
※EC2の停止でパブリックIPが変わり、アクセス出来なくなる問題が発生した場合は以下コマンドを実行すれば解消します。
wp option update home http://$(curl inet-ip.info) --path=/var/www/html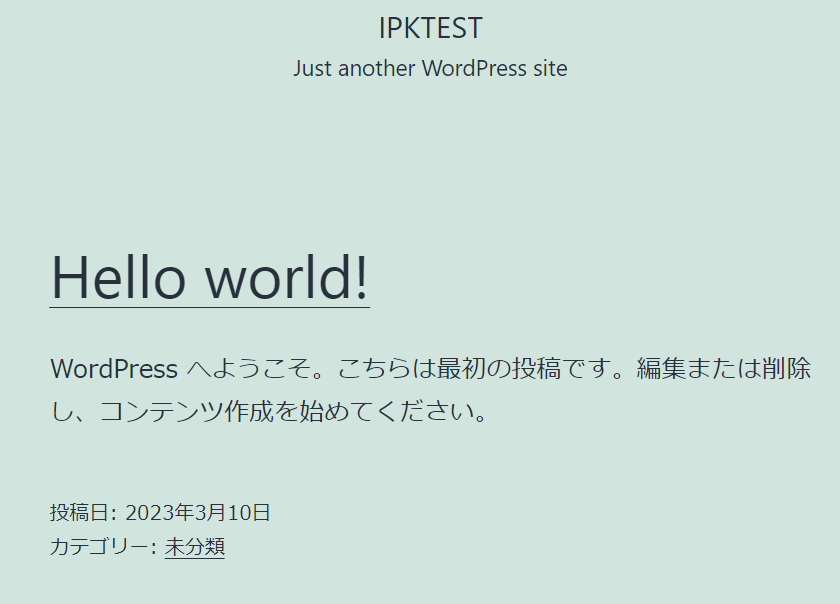
3. WordPressの管理画面にログイン出来ることを確認
– ユーザー名:bloguser
– パスワード:b10Gb10G
※EC2を停止する等でパブリックIPが変わり、アクセス出来ない等の問題が発生した場合は以下コマンドを実行すれば解消します。
wp option update siteurl http://$(curl inet-ip.info) --path=/var/www/html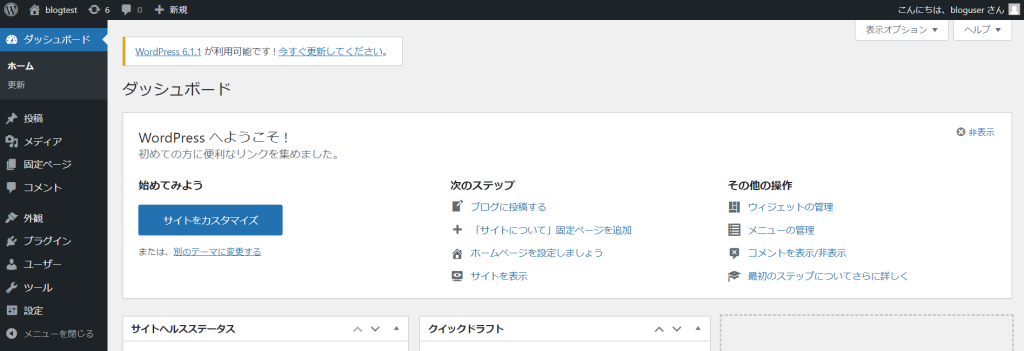
TerraformでASGを作成
1. `vi aws_asg.tf`でEC2のAMIを作成し、AMIからASGを作成するtfファイルを作成
– AMI:Resource: aws_ami_from_instance
– 起動テンプレート:Resource: aws_launch_template
– ASG:Resource: aws_autoscaling_group
#----------------------------------------
# EC2インスタンスからAMIを作成
#----------------------------------------
resource "aws_ami_from_instance" "BlogAMI" {
  name               = "BlogAMI"
  source_instance_id = aws_instance.blog_wp01.id
  tags = {
    Name   = "BlogAMI"
  }
}

#----------------------------------------
# AMIから起動テンプレートを作成
#----------------------------------------
resource "aws_launch_template" "BlogTemplate" {
  name          = "BlogTemplate"
  image_id      = aws_ami_from_instance.BlogAMI.id
  instance_type = "t2.micro"
  key_name      = "KEY_BlogSample"
  user_data = base64encode(
    <<-EOF
      #!/bin/bash
      wp option update home http://$(curl inet-ip.info) --path=/var/www/html
      wp option update siteurl http://$(curl inet-ip.info) --path=/var/www/html
    EOF
  )
  network_interfaces {
    security_groups = [aws_security_group.sg_blog.id]
    subnet_id       = aws_subnet.pub_subnet1a_blog.id
  }
  iam_instance_profile {
    arn = "arn:aws:iam::596526128538:instance-profile/ROLE_BLOG"
  }
  tags = {
    Name      = "BlogTemplate"
  }
}

#----------------------------------------
# 起動テンプレートからASGを作成
#----------------------------------------
resource "aws_autoscaling_group" "BlogASG" {
  name                    = "BlogASG"
  protect_from_scale_in   = true
  service_linked_role_arn = aws_iam_role.AWSServiceRoleForAutoScaling.arn
  vpc_zone_identifier     = [aws_subnet.pub_subnet1a_blog.id]
  max_size                = 1
  min_size                = 1
  desired_capacity        = 1
  launch_template {
    name    = aws_launch_template.BlogTemplate.name
    version = "$Latest"
  }
  tag {
    key                 = "Name"
    propagate_at_launch = true
    value               = "BlogASG"
  }
}
2. ASGを作成して管理
terraform plan
terraform apply
3. 構成図のASGが作成されていることを確認

4. 作成したterraformのディレクトリ構成
.
├── .terraform
│   └── providers
│       └── registry.terraform.io
│           └── hashicorp
│               └── aws
│                   └── 4.57.1
│                       └── linux_amd64
│                           └── terraform-provider-aws_v4.57.1_x5
├── .terraform.lock.hcl
├── aws_asg.tf
├── aws_data.tf
├── aws_ec2.tf
├── aws_iam.tf
├── aws_vpc.tf
├── provider.tf
├── terraform.tfstate
└── terraform.tfstate.backup
改善点
今回はインフラを管理するツールとして個人的に使いやすいTerraformを使用しましたが、普段からコードをゴリゴリ書いている人だと知見を活用できるためPulumiを使用した方が良いと思います。またAWSのサービスで統一したい場合はCloudFormationを使用しても良いです。
さらにサーバーの初期設定にAnsibleを使用していますが、こちらもAWSのサービスで統一したい場合はOpsWorksを使用しても良いです。その場合はAnsibleは使用できないためChefかPuppetを使用することになります。
またTerraformで一部のリソースを作成済みのものをインポートしていますが、実際の業務では手動で設定の作成や変更をするのはオススメしません。リソースを追加するにはtfファイルを書き換えるというルールを作るのが良いです。
所感
今回初めてWP-CLIを使用しましたが、WordPressをコマンドでダウンロードやインストールをしたり、GIPがインストール時と変わってもコマンドで設定を修正可能なため非常に便利でした。
前編ではインフラとWordPressの構築まで行いましたが、後編ではEC2 Image Builderでのゴールデンイメージ作成やCodeDeployを使用した自動デプロイを行います。