
こんにちは。GSです。
今の時代、開発から運用までLinuxを必要とするケースはとても多いです。
WindowsユーザーがLinux環境が必要な開発を行うとき、WSL2を使うことで手軽に環境を作り利用することができます。
「Windowsは使えるが、Linuxはよくわからない」といった人が、できるだけ手間なく・手が止まることなく使える状態にし、実際に開発や検証に入れるような環境をWSL2を使ってささっと作り上げる手順をご紹介したいと思います。
ゴール
- Windows上からGUIを操作することなく、コマンドのコピペで環境を作り上げる
- 開発に困らないであろう最低限レベルに達するために必要なものをすぐ使えるように
- 開発や検証行為をLinuxに寄せすぎないようにし、Windowsのツールを十分に活用する
WSL2とは?
そもそもWSL2は何なんのでしょうか?
WSL2とは、Windows Subsystem for Linux 2の略称で、Windows上でLinux環境を動かすための機能です。Windows 10 / 11の最新バージョンであれば、デフォルトでWSL2を使用することができます。
「Windows上でLinux環境を動かす」いうだけでなく、Windowsの一部としてのLinux、Linuxの一部としてのWindowsと言わんばかりに非常にシームレスな統合が行われるといったような特徴があります。
このシームレスな統合のお陰で、LinuxからWindows上のアプリをLinuxファイルシステムの上で起動したり、Windows GUIからLinuxへファイルを作成したりといったことも容易にできます。
検証環境(余談)|WSL2環境構築
今回この記事を書くにあたり、Windows 仮想マシンをダウンロードする – Windows アプリ開発 | Microsoft Developerにあるイメージを使用してWSL2環境構築を行っていきました。
提供されている開発用イメージは、その名の通り開発に必要なソフトウェア(WSL2も含まれる)がある程度セットアップされています。
ですので、それらを一度削除し、限りなくまっさらなWindows環境に戻し検証を行っています。
💡 開発用マシンは英語環境のWindowsとなっています。日本語でセットアップを行いたい方は別途日本語化対応を行ってください。日本語化設定方法については「おまけ」セクションを参照してください。
また、今回の検証はHyper-V用イメージで行っており、Hyper-V内でWSL2を動かすためにホスト側で追加の設定を行っています。
Hyper-V用仮想マシンを、Winという名前に設定し
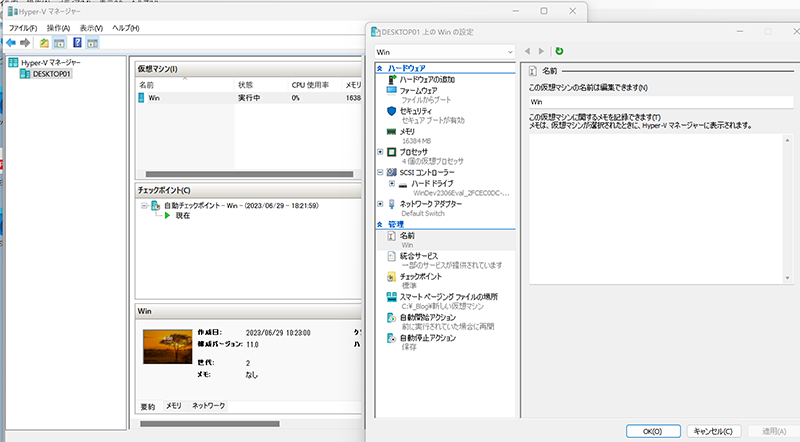
PowerShellを管理者として実行した上で
Set-VMProcessor -VMName "Win" -ExposeVirtualizationExtensions $trueというコマンドを実行しています。このコマンドを実行することで、Hyper-V上で仮想マシンやWSL2を実行できるようになります。
💡 Hyper-VはDISM.exe /Online /Enable-Feature /All /FeatureName:Microsoft-Hyper-V
というコマンドを管理者として実行することでインストール可能です。
動作環境確認|WSL2環境構築
CPU
仮想化支援機能がついているCPUが必要です。10年ほど前のPCでも付いている機能なので、それほど問題視する必要はありませんが、動作しない場合はお使いのコンピューターに搭載されているCPUのスペックを確認してください。
Windows バージョン
ファイル名を指定して実行(Windows キー + R)より、「winver」を入力することで確認可能。
- Windows 10
- x64 システムの場合: バージョン 1903 以降 (ビルド 18362.1049 以降)。
- ARM64 システムの場合: バージョン 2004 以降 (ビルド 19041 以降)。
- Windows 11
- 特になし
Windows 10で規定バージョンに満たない場合、Windowsそのものを更新する必要があります。
Windows Package Manager(WinGet)
「Windows Package Manager」は、「Windows 10 バージョン 1809」以降および「Windows 11」で利用可能なコマンドラインツールで、アプリケーションのインストール・アップデート・アンインストールを実行できるパッケージ管理システムです。
Linuxでいえば、「apt」や「yum」。Macで言えば「brew」などに相当します。
Windowsといえば、インストールしたいアプリケーションが提供されているホームページへアクセスしダウンロード→解凍→インストールという流れでアプリケーションをインストールすることが多いと思いますが、wingetコマンドであれば、ほしいアプリケーションをコマンド1行で打つだけで即座に導入できるようになります。
💡 wingetのようなコマンドとしてScoopやChocolatey Software | Chocolatey – The package manager for Windowsがあります。Scoopは開発者向けのアプリケーション(コマンド)が多く、Chocolateyは一般的なアプリケーションが多いです。
ファイル名を指定して実行(Windows キー + R)より、「cmd」を入力しコマンドプロンプトを開き、winget --versionを入力します。
C:\users\User>winget --version
v1.4.11071
コマンドがインストールされ使える状況であれば、上記のようなメッセージが表示されます。
コマンドが見つからずにエラーとなったり、表示されるバージョンが古く更新したい場合などは、
よりインストールまたは更新することで、最新バージョンが利用可能になります。
続けてアプリケーションを実際に検索し、インストールしてみます。
Windows Terminalをインストール
winget search "windows terminal"と入力してみましょう。
C:\Users\User>winget search "windows terminal"
名前                     ID                                バージョン   ソース
--------------------------------------------------------------------------------
'msstore' ソースでは、使用する前に次の契約を表示する必要があります。
Terms of Transaction: https://aka.ms/microsoft-store-terms-of-transaction
ソースが正常に機能するには、現在のマシンの 2 文字の地理的リージョンをバックエンド サービスに送信する必要があります (例: "US")。

すべてのソース契約条件に同意しますか?
[Y] はい  [N] いいえ: y
名前                     ID                                バージョン   ソース
-------------------------------------------------------------------------------
Windows Terminal         9N0DX20HK701                      Unknown      msstore
Windows Terminal Preview 9N8G5RFZ9XK3                      Unknown      msstore
Windows Terminal         Microsoft.WindowsTerminal         1.16.10261.0 winget
Windows Terminal Preview Microsoft.WindowsTerminal.Preview 1.17.10234.0 winget
wingetコマンドでアプリケーション検索を初めて行う場合、「ソース契約条件に同意しますか?」というメッセージが表示されるので、Yを入力し同意します。
今回は4つ候補表示されました。ソースがmsstoreとなっているものが、ストアアプリからインストール可能なパッケージとなります。
今回はこのストアアプリからも入れられるパッケージをwingetコマンドで入れてみます。
searchコマンドで表示されたIDをwingetコマンドの引数として指定することでダウンロードおよびインストールします(パッケージ名でもダウンロードすることは可能です)。
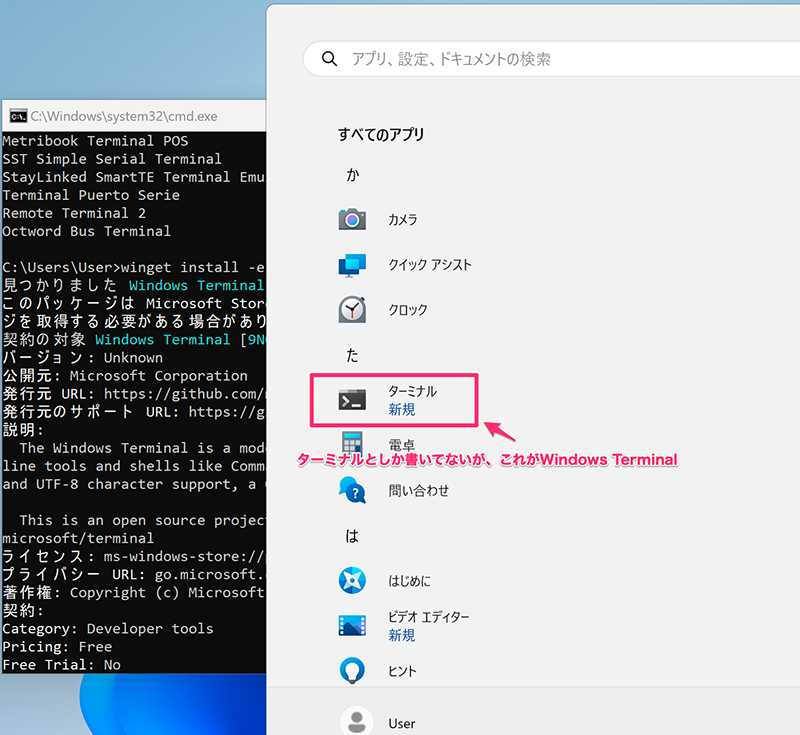
C:\Users\User>winget install -e --id 9N0DX20HK701
見つかりました Windows Terminal [9N0DX20HK701] バージョン Unknown
このパッケージは Microsoft Store から提供されています。winget は、現在のユーザーに代わって Microsoft Store からパッケー ジを取得する必要がある場合があります。
契約の対象 Windows Terminal [9N0DX20HK701] バージョン Unknown
バージョン: Unknown
公開元: Microsoft Corporation
発行元 URL: https://github.com/microsoft/terminal
発行元のサポート URL: https://github.com/microsoft/terminal/issues/new
説明:
  The Windows Terminal is a modern, fast, efficient, powerful, and productive terminal application for users of command-line tools and shells like Command Prompt, PowerShell, and WSL. Its main features include multiple tabs, panes, Unicode and UTF-8 character support, a GPU accelerated text rendering engine, and custom themes, styles, and configurations.

  This is an open source project and we welcome community participation. To participate please visit https://github.com/microsoft/terminal
ライセンス: ms-windows-store://pdp/?ProductId=9N0DX20HK701
プライバシー URL: go.microsoft.com/fwlink/?LinkID=521839
著作権: Copyright (c) Microsoft Corporation
契約:
Category: Developer tools
Pricing: Free
Free Trial: No
Terms of Transaction: https://aka.ms/microsoft-store-terms-of-transaction
Seizure Warning: https://aka.ms/microsoft-store-seizure-warning
Store License Terms: https://aka.ms/microsoft-store-license

発行元は、お客様がインストール前に上記の情報を表示し、契約に同意することを必要としています。
使用条件に同意しますか?
[Y] はい  [N] いいえ: Y
パッケージ取得の確認/要求...
パッケージ取得の成功の確認/要求
パッケージのインストールを開始しています...
  ██████████████████████████████  100%
インストールが完了しました
インストールされ、使える状況になっているのが確認できます。
無論ストアからもインストール可能です。
https://www.microsoft.com/store/productId/9N0DX20HK701
URLを見るとわかりますが、wingetで指定したIDがURLに含まれています。
💡 wingetコマンドを使用してのアプリケーション削除は、winget uninstall -e --id 9N0DX20HK701
のように、installをuninstallに置き換えるだけで行えます。
以降の作業は、コマンドプロンプトではなくWindows Terminalで行っていきます。
Visual Studio Codeをインストール
Windows Terminalを起動し、winget search -s msstore "Visual Studio Code"と入力します。
PS C:\Users\User> winget search -s msstore "Visual Studio Code"
名前                          ID             バージョン
-------------------------------------------------------
Visual Studio Code            XP9KHM4BK9FZ7Q Unknown
Visual Studio Code - Insiders XP8LFCZM790F6B Unknown今回は-s msstoreオプションを付け、ストアアプリからインストール可能なアプリケーションのみを検索対象としています。
続けてインストールを行います。
winget install -e --id XP9KHM4BK9FZ7Qと入力。
PS C:\Users\User> winget install -e --id XP9KHM4BK9FZ7Q
見つかりました Visual Studio Code [XP9KHM4BK9FZ7Q] バージョン Unknown
このアプリケーションは所有者からライセンス供与されます。
Microsoft はサードパーティのパッケージに対して責任を負わず、ライセンスも付与しません。
契約の対象 Visual Studio Code [XP9KHM4BK9FZ7Q] バージョン Unknown
バージョン: Unknown
公開元: Microsoft Corporation
発行元 URL: https://code.visualstudio.com/
説明:
  Visual Studio Code is a free, lightweight, and extensible code editor for building web, desktop, and mobile applications, using any programming language and framework.

  Visual Studio Code has built-in support for Git source control management and powerful integrations with GitHub, an integrated debugger, and smart code completion with IntelliSense and with AI-driven IntelliCode. With over 30,000 extensions and themes in the Visual Studio Code Marketplace, you can customize the features and the look of Visual Studio Code to fit your needs, preferences, and style.

  You can use Visual Studio Code to build any kind of app, for web, desktop, and mobile. Visual Studio Code supports JavaScript and TypeScript natively and offers extensions for coding in languages such as Python, Java, C/C++, C#, Go, Rust, PHP, and many more.
ライセンス: https://code.visualstudio.com/License/
プライバシー URL: https://privacy.microsoft.com/en-US/privacystatement
著作権: ms-windows-store://pdp/?ProductId=XP9KHM4BK9FZ7Q
タグ:
  programming
  coding
  code
  vscode
  vs
  editor
契約:
Category: Developer tools
Pricing: Free
Free Trial: No
Terms of Transaction: https://aka.ms/microsoft-store-terms-of-transaction
Seizure Warning: https://aka.ms/microsoft-store-seizure-warning
Store License Terms: https://aka.ms/microsoft-store-license

発行元は、お客様がインストール前に上記の情報を表示し、契約に同意することを必要としています。
使用条件に同意しますか?
[Y] はい  [N] いいえ: Y
ダウンロード中 https://sparkcdneus2.azureedge.net/cachedpackages/973b41be-5827-46f6-ab6d-637c2942eb33_9490453f2d73eb32f365c631bbad3b9d4837af27ce31ad6cb3dad56c50b0a5fa
  ██████████████████████████████  6.34 MB / 6.34 MB
インストーラーハッシュが正常に検証されました
パッケージのインストールを開始しています...
インストールが完了しました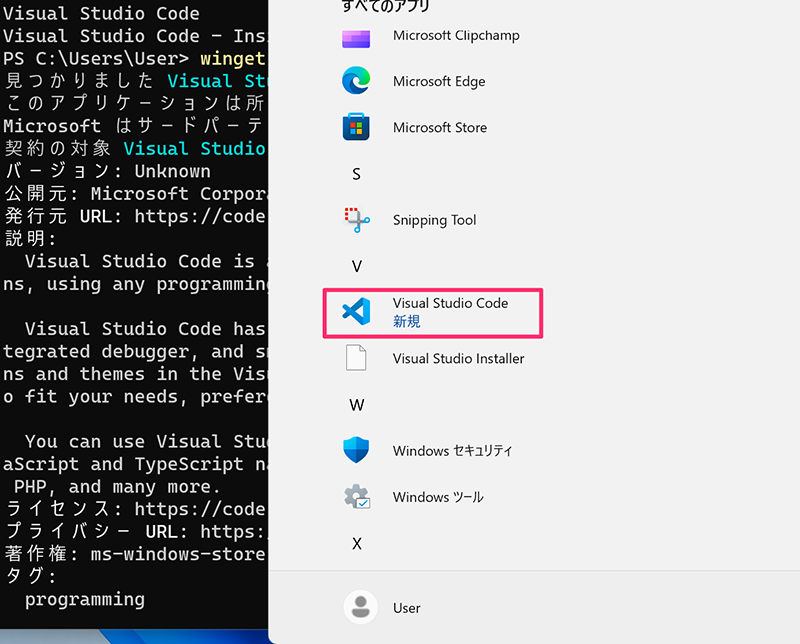
Visual Studio Codeがインストールされていることが確認できます。
ついでにVisual Studio Code拡張機能も入れてみましょう。
code --install-extension ms-vscode-remote.vscode-remote-extensionpack
このコマンドを実行することで、「Remote Development – Visual Studio Marketplace」がインストールされます。
この拡張機能を入れておくことで、さまざまな環境に対して接続し、開発や検証作業を行うことが可能になります。
PS C:\Users\User> code --install-extension ms-vscode-remote.vscode-remote-extensionpackWSL2をインストールする
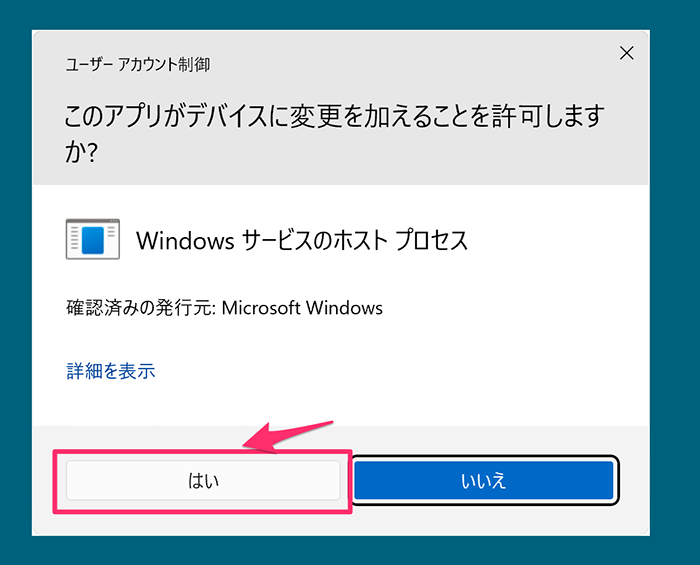
Windows10 バージョン 2004 以上 (ビルド 19041 以上) または Windows11 を実行している方は、Windows Terminalを管理者モードで開き(PowerShellが管理者モードで起動します)、wsl --install コマンドを入力します。
💡 Windows上からPowerShellやコマンドプロンプトなどを管理者として実行する場合、右クリックから「管理者として実行」を選ぶ方は多いと思いますが、CTRL+SHIFTキーを押しながら起動(マウスクリックやエンターキー)することでも管理者として起動できます。ファイル名を指定して実行(Windows キー + R)で入力したコマンドも、CTRL+SHIFTで実行すれば、管理者モードで開くことが可能です。
コマンドを実行すると、許可ダイアログがあがってくるので、「はい」を選択します。
PS C:\Users\User> wsl --install
インストール中: Linux 用 Windows サブシステム
Linux 用 Windows サブシステム はインストールされました。
インストール中: Ubuntu
Ubuntu はインストールされました。
要求された操作は正常に終了しました。変更を有効にするには、システムを再起動する必要があります。
メッセージの内容から、WSLのセットアップが完了し、Ubuntuがインストールされたことがわかります。
表示されているメッセージの通り、再起動を行いましょう。
💡wsl —list —onlineコマンドで、WSL環境へインストール可能なディストリービューション一覧を見ることができます。
たとえばDebianをインストールしたいという場合、wsl --install -d Debianコマンドで可能です。
再起動後、Windows Terminalが自動的に起動し、Ubuntuのインストール処理が進行します。
その過程でUbuntuで利用するユーザーとそのパスワードを設定する必要があります。
今回はユーザー名「ubuntu」、パスワード「ubuntu」で設定しました。
Ubuntu を起動しています...
Installing, this may take a few minutes...
Please create a default UNIX user account. The username does not need to match your Windows username.
For more information visit: https://aka.ms/wslusers
Enter new UNIX username: ubuntu
New password:
Retype new password:
passwd: password updated successfully
この操作を正しく終了しました。
Installation successful!
To run a command as administrator (user "root"), use "sudo <command>".
See "man sudo_root" for details.

Welcome to Ubuntu 22.04.2 LTS (GNU/Linux 5.15.90.1-microsoft-standard-WSL2 x86_64)

 * Documentation:  https://help.ubuntu.com
 * Management:     https://landscape.canonical.com
 * Support:        https://ubuntu.com/advantage

This message is shown once a day. To disable it please create the
/home/ubuntu/.hushlogin file.
ubuntu@WinDev2306Eval:~$
以上でWSL2を有効にし、Ubuntuのインストールは完了です。
WSL2をコマンドでインストール出来ない場合
多少古いバージョンのWindows 10だと、wsl -—installコマンドではインストールできません。
そのため、別途個別に必要なソフトウェアをインストールしていく必要があります。
Linux 用 Windows サブシステムと仮想マシンの機能を有効にする
Windows Terminalを管理者として実行し、以下のコマンドを実行しましょう。
dism.exe /online /enable-feature /featurename:Microsoft-Windows-Subsystem-Linux /all /norestart
dism.exe /online /enable-feature /featurename:VirtualMachinePlatform /all /norestart
実行後、再起動します。
Linux カーネル更新プログラム パッケージをダウンロードし、インストールする
再度、Windows Terminalを管理者として実行。
wget https://wslstorestorage.blob.core.windows.net/wslblob/wsl_update_x64.msi -OutFile wsl_update_x64.msimsiexec /i wsl_update_x64.msi /passivedel wsl_update_x64.msi
の順番にコマンドを実行し、Linuxカーネルを更新します。
PS C:\Users\User> wget https://wslstorestorage.blob.core.windows.net/wslblob/wsl_update_x64.msi -OutFile wsl_update_x64.msi
PS C:\Users\User> msiexec /i wsl_update_x64.msi /passive
PS C:\Users\User> del wsl_update_x64.msi
WSL 2 を既定のバージョンとして設定する
wsl --set-default-version 2を実行します。
PS C:\Users\User> wsl --set-default-version 2WSLを更新する
wsl —updateにて更新します
PS C:\Users\User> wsl --updateWSL2へUbuntuをインストール
PS C:\Users\User> wsl --install -d Ubuntu以上で、手動によるWSL2とUbuntuのインストールは完了です。
Ubuntuセットアップ|WSL2・Ubuntuインストール後
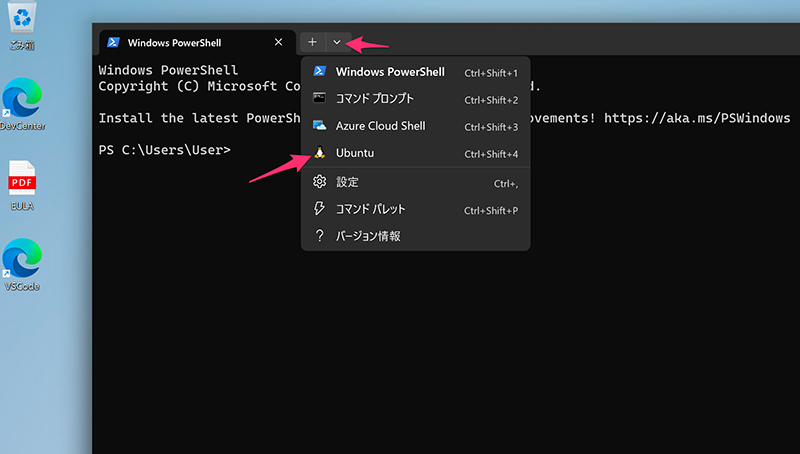
まずは、Ubuntuを起動してみましょう。
Windows Terminalを実行します。
画面上部の「∨」を選択すると、Ubuntuが候補として表示されていることが確認できます。こちらを選択し、Ubuntuを起動しましょう。
systemdを有効化する
今後Ubuntuへインストール及び設定していくアプリケーションのために、systemdを有効にしておきます。
以下のコマンドを4行分一気に貼り付け実行します。
cat <<EOF | sudo tee /etc/wsl.conf
[boot]
systemd=true
EOF
以下が実際にインストールしてみた例です。
途中でubuntuユーザーのパスワードを聞かれますので、事前に設定したパスワードである「ubuntu」を入力しました。
ubuntu@WinDev2306Eval:~$ cat <<EOF | sudo tee /etc/wsl.conf
[boot]
systemd=true
EOF
[sudo] password for ubuntu:
[boot]
systemd=true
コマンドを実行したら、PowerShellからwslをシャットダウンします。
PS C:\Users\User> wsl --shutdown再度、Ubuntuを起動すると、systemdが有効になっています。
sshを有効にする
まずはopenssh-serverをインストールしましょう。
sudo apt install -y openssh-serverその上で、sshを有効にします。
sudo systemctl enable ssh

sudo service ssh restart
以上で、sshを使うための最小限の設定は終わりですが、sshに鍵でアクセスしたい場合や、パスワードログインを無効にしたいといった場合、設定を変更する必要があります。
今回は後続で説明するTailscaleのために、初期設定のまま話を進めていきます。
docker
dockerとは?
dockerは、コンテナ技術を利用してアプリケーションをパッケージング・配布するためのプラットフォームです。
誤解を恐れずに言えば、ワンコマンドで色々なアプリケーション(Webサーバーとかデータベースサーバーとか)を立ち上げてくれるすごいヤツでしょうか。
インストール
以下のコマンドを実行し、dockerが必要としているパッケージをインストールします。
sudo apt-get update -y && sudo apt-get install ca-certificates curl gnupg -ydockerインストールに必要なGPG情報をセットアップします。
sudo install -m 0755 -d /etc/apt/keyrings
curl -fsSL https://download.docker.com/linux/ubuntu/gpg | sudo gpg --dearmor -o /etc/apt/keyrings/docker.gpg
sudo chmod a+r /etc/apt/keyrings/docker.gpg
docker関係のリポジトリを追加します。
echo \
  "deb [arch="$(dpkg --print-architecture)" signed-by=/etc/apt/keyrings/docker.gpg] https://download.docker.com/linux/ubuntu \
  "$(. /etc/os-release && echo "$VERSION_CODENAME")" stable" | \
  sudo tee /etc/apt/sources.list.d/docker.list > /dev/null
dockerをインストールします。
sudo apt-get update -y && sudo apt-get install -y docker-ce docker-ce-cli containerd.io docker-buildx-plugin docker-compose-plugin今現在ログインしているユーザーをdockerグループへ所属させます(dockerコマンドを管理者権限なしに実行できるようにするため)。
sudo usermod -aG docker $(whoami)上記工程をすべて実行した例は以下のとおりです。
ubuntu@WinDev2306Eval:~$ sudo apt-get update -y && sudo apt-get install ca-certificates curl gnupg -y
Hit:1 http://archive.ubuntu.com/ubuntu jammy InRelease
Hit:2 http://security.ubuntu.com/ubuntu jammy-security InRelease
Hit:3 http://archive.ubuntu.com/ubuntu jammy-updates InRelease
Hit:4 http://archive.ubuntu.com/ubuntu jammy-backports InRelease
Reading package lists... Done
Updating certificates in /etc/ssl/certs...
略
0 added, 0 removed; done.
Running hooks in /etc/ca-certificates/update.d...
done.

ubuntu@WinDev2306Eval:~$ sudo install -m 0755 -d /etc/apt/keyrings
curl -fsSL https://download.docker.com/linux/ubuntu/gpg | sudo gpg --dearmor -o /etc/apt/keyrings/docker.gpg
sudo chmod a+r /etc/apt/keyrings/docker.gpg

ubuntu@WinDev2306Eval:~$ echo   "deb [arch="$(dpkg --print-architecture)" signed-by=/etc/apt/keyrings/docker.gpg] https://download.docker.com/linux/ubuntu \
  "$(. /etc/os-release && echo "$VERSION_CODENAME")" stable" |   sudo tee /etc/apt/sources.list.d/docker.list > /dev/null
[sudo] password for ubuntu:

ubuntu@WinDev2306Eval:~$ sudo apt-get update -y && sudo apt-get install -y docker-ce docker-ce-cli containerd.io docker-buildx-plugin docker-compose-plugin
Get:1 https://download.docker.com/linux/ubuntu jammy InRelease [48.9 kB]
Get:2 https://download.docker.com/linux/ubuntu jammy/stable amd64 Packages [19.2 kB]
Hit:3 http://archive.ubuntu.com/ubuntu jammy InRelease
Hit:4 http://archive.ubuntu.com/ubuntu jammy-updates InRelease
略
Processing triggers for man-db (2.10.2-1) ...
Processing triggers for libc-bin (2.35-0ubuntu3.1) ...
ubuntu@WinDev2306Eval:~$ sudo usermod -aG docker $(whoami)
[sudo] password for ubuntu:
この時点で一度WSLを終了し、再度起動し直してみましょう。
終了は例によってPowerShellで行います。
PS C:\Users\User> wsl --shutdownUbuntuを再起動した後
docker run hello-worldと入力してみましょう。
以下のように表示されたら、dokcerのセットアップは完了です。
ubuntu@WinDev2306Eval:~$ docker run hello-world
Unable to find image 'hello-world:latest' locally
latest: Pulling from library/hello-world
719385e32844: Pull complete
Digest: sha256:a13ec89cdf897b3e551bd9f89d499db6ff3a7f44c5b9eb8bca40da20eb4ea1fa
Status: Downloaded newer image for hello-world:latest

Hello from Docker!
This message shows that your installation appears to be working correctly.

To generate this message, Docker took the following steps:
 1. The Docker client contacted the Docker daemon.
 2. The Docker daemon pulled the "hello-world" image from the Docker Hub.
    (amd64)
 3. The Docker daemon created a new container from that image which runs the
    executable that produces the output you are currently reading.
 4. The Docker daemon streamed that output to the Docker client, which sent it
    to your terminal.

To try something more ambitious, you can run an Ubuntu container with:
 $ docker run -it ubuntu bash

Share images, automate workflows, and more with a free Docker ID:
 https://hub.docker.com/

For more examples and ideas, visit:
 https://docs.docker.com/get-started/
もう一つテストで実行してみましょう。
今回はnginx(Webサーバー)を起動してみます。
docker run -d --rm --name nginx -p 80:80 nginx実行後、curlコマンドを使うことで、nginxが起動していることを確認できます。
ubuntu@WinDev2306Eval:~$ docker run -d --rm --name nginx -p 80:80 nginx
Unable to find image 'nginx:latest' locally
latest: Pulling from library/nginx
5b5fe70539cd: Pull complete
441a1b465367: Pull complete
3b9543f2b500: Pull complete
ca89ed5461a9: Pull complete
b0e1283145af: Pull complete
4b98867cde79: Pull complete
4a85ce26214d: Pull complete
Digest: sha256:593dac25b7733ffb7afe1a72649a43e574778bf025ad60514ef40f6b5d606247
Status: Downloaded newer image for nginx:latest
f82668128daf973712be676fc2ed7c18e67c80de57980eb61708aba1109799e8
ubuntu@WinDev2306Eval:~$ curl localhost
<!DOCTYPE html>
<html>
<head>
<title>Welcome to nginx!</title>
<style>
html { color-scheme: light dark; }
body { width: 35em; margin: 0 auto;
font-family: Tahoma, Verdana, Arial, sans-serif; }
</style>
</head>
<body>
<h1>Welcome to nginx!</h1>
<p>If you see this page, the nginx web server is successfully installed and
working. Further configuration is required.</p>

<p>For online documentation and support please refer to
<a href="http://nginx.org/">nginx.org</a>.<br/>
Commercial support is available at
<a href="http://nginx.com/">nginx.com</a>.</p>

<p><em>Thank you for using nginx.</em></p>
</body>
</html>
Windowsからも動作確認が行なえます。任意のブラウザでlocalhostを開いてみましょう。
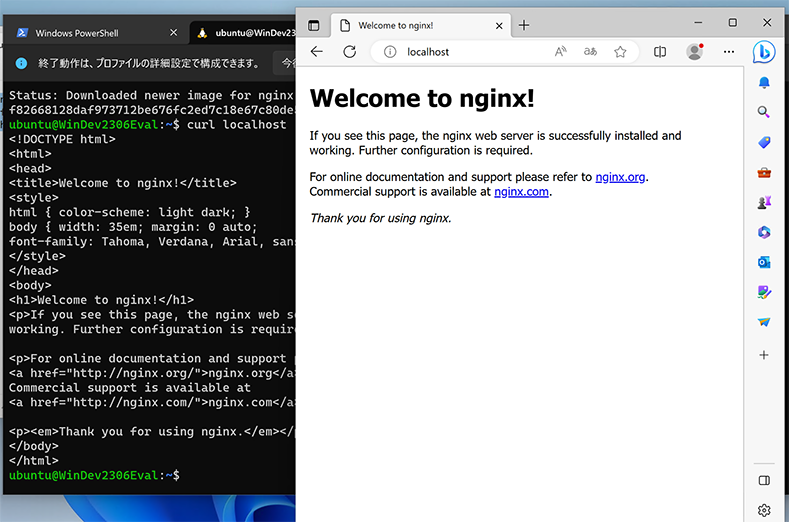
WSL2上のUbuntuの上に起動するdockerで立ち上げたnginxに対し、Windowsからアクセスできることが確認できます。
起動したnginxを終了させるには
docker stop nginxを実行します。
💡 dockerコマンドを実行しコンテナを起動させようとしたところエラーが出るという場合、すでにWindows側にdocker関係のプロダクトが入っている可能性が高いです。 WSL2側でdockerを実行したい場合、Windows側のdockerプロダクトはすべて削除しておく必要があります(厳密に言えば、削除しておいたほうが無難です)。
💡 Windowsにインストールする「Docker Desktop for Windows」というdockerプロダクトがあります。こちらを使うことでもWindowsマシンでdockerを使うことは可能です。WSL2にdockerをインストールして使うのと、「Docker Desktop for Windows」を使うのどちらが良いでしょうか? 個人的な意見としては、WSL2 + dockerが良いかなと思っています。というのも「Docker Desktop for Windows」だと、シンボリックリンクを多用したシェルスクリプトの実行に問題があったり、ファイルシステムのアクセス速度に問題があるからです。
Homebrew
Homebrewとは?
Homebrewは、macOSやLinuxなどのオペレーティングシステム向けのパッケージマネージャで、ターミナルからコマンドを実行することで様々なアプリケーションやライブラリを簡単にインストールできます。また、自分でパッケージを作成することもできます。Homebrewを使うことで、より簡単・効率的な開発環境構築が可能になります。
インストール
以下のコマンドを実行します。
/bin/bash -c "$(curl -fsSL https://raw.githubusercontent.com/Homebrew/install/HEAD/install.sh)"実行すると、出力されるメッセージの最後の方に
==> Next steps:
- Run these two commands in your terminal to add Homebrew to your PATH:
    (echo; echo 'eval "$(/home/linuxbrew/.linuxbrew/bin/brew shellenv)"') >> /home/ubuntu/.profile
    eval "$(/home/linuxbrew/.linuxbrew/bin/brew shellenv)"
- Install Homebrew's dependencies if you have sudo access:
    sudo apt-get install build-essential
  For more information, see:
    https://docs.brew.sh/Homebrew-on-Linux
- We recommend that you install GCC:
    brew install gcc
- Run brew help to get started
- Further documentation:
    https://docs.brew.sh
と表示されるので、この内容に従ってコマンドを実行します。
(echo; echo 'eval "$(/home/linuxbrew/.linuxbrew/bin/brew shellenv)"') >> /home/ubuntu/.profile

eval "$(/home/linuxbrew/.linuxbrew/bin/brew shellenv)"

sudo apt-get install -y build-essential

brew install gcc
以下が実際にインストールしてみた例です。
ubuntu@WinDev2306Eval:~$ (echo; echo 'eval "$(/home/linuxbrew/.linuxbrew/bin/brew shellenv)"') >> /home/ubuntu/.profile

ubuntu@WinDev2306Eval:~$ eval "$(/home/linuxbrew/.linuxbrew/bin/brew shellenv)"

ubuntu@WinDev2306Eval:~$ sudo apt-get install build-essential
[sudo] password for ubuntu:
Reading package lists... Done
Building dependency tree... Done
Reading state information... Done
The following additional packages will be installed:
  bzip2 cpp cpp-11 dpkg-dev fakeroot fontconfig-config fonts-dejavu-core g++ g++-11 gcc gcc-11 gcc-11-base
略
update-alternatives: using /usr/bin/g++ to provide /usr/bin/c++ (c++) in auto mode
Setting up build-essential (12.9ubuntu3) ...
Processing triggers for man-db (2.10.2-1) ...
Processing triggers for libc-bin (2.35-0ubuntu3.1) ...

ubuntu@WinDev2306Eval:~$ brew install gcc
==> Fetching dependencies for gcc: gmp, isl, mpfr, libmpc, lz4, xz, zlib, zstd and binutils
==> Fetching gmp
略
🍺  /home/linuxbrew/.linuxbrew/Cellar/gcc/13.1.0: 1,668 files, 320.2MB
==> Running `brew cleanup gcc`...
Disable this behaviour by setting HOMEBREW_NO_INSTALL_CLEANUP.
Hide these hints with HOMEBREW_NO_ENV_HINTS (see `man brew`).
以上でHomebrewのセットアップは終わりです。
このあとの工程でbrewコマンドを使い、アプリケーションをインストールしていきます。
Tailscale
Tailscaleとは?
Tailscaleは、オープンソースのソフトウェアで構成された仮想プライベートネットワーク(VPN)を作成することができるソフトウェアです。
Tailscaleで簡単に繋がるネットワーク | Sqripts
という記事を公開しているので、参考にしてみてください。

インストール
以下のコマンドを実行します。
curl -fsSL https://tailscale.com/install.sh | shコマンド実行後、最下部に
sudo tailscale upと表示されるので、そのとおりに実行します。
以下が実際にインストールしてみた例です。
ubuntu@WinDev2306Eval:~$ curl -fsSL https://tailscale.com/install.sh | sh
Installing Tailscale for ubuntu jammy, using method apt
+ sudo mkdir -p --mode=0755 /usr/share/keyrings
+ + sudocurl tee -fsSL /usr/share/keyrings/tailscale-archive-keyring.gpg https://pkgs.tailscale.com/stable/ubuntu/jammy.noarmor.gpg

+ curl -fsSL https://pkgs.tailscale.com/stable/ubuntu/jammy.tailscale-keyring.list
+ sudo tee /etc/apt/sources.list.d/tailscale.list
# Tailscale packages for ubuntu jammy
deb [signed-by=/usr/share/keyrings/tailscale-archive-keyring.gpg] https://pkgs.tailscale.com/stable/ubuntu jammy main
+ sudo apt-get update
Hit:1 https://download.docker.com/linux/ubuntu jammy InRelease
Get:2 http://security.ubuntu.com/ubuntu jammy-security InRelease [110 kB]
Get:3 https://pkgs.tailscale.com/stable/ubuntu jammy InRelease
Get:4 https://pkgs.tailscale.com/stable/ubuntu jammy/main amd64 Packages [8434 B]
Get:5 https://pkgs.tailscale.com/stable/ubuntu jammy/main all Packages [354 B]
Hit:6 http://archive.ubuntu.com/ubuntu jammy InRelease
Get:7 http://archive.ubuntu.com/ubuntu jammy-updates InRelease [119 kB]
Get:8 http://archive.ubuntu.com/ubuntu jammy-backports InRelease [108 kB]
Fetched 352 kB in 28s (12.7 kB/s)
Reading package lists... Done
+ sudo apt-get install -y tailscale tailscale-archive-keyring
Reading package lists... Done
Building dependency tree... Done
Reading state information... Done
The following NEW packages will be installed:
  tailscale tailscale-archive-keyring
0 upgraded, 2 newly installed, 0 to remove and 56 not upgraded.
Need to get 23.7 MB of archives.
After this operation, 44.0 MB of additional disk space will be used.
Get:1 https://pkgs.tailscale.com/stable/ubuntu jammy/main amd64 tailscale amd64 1.44.0 [23.7 MB]
Get:2 https://pkgs.tailscale.com/stable/ubuntu jammy/main all tailscale-archive-keyring all 1.35.181 [3082 B]
Fetched 23.7 MB in 17s (1419 kB/s)
Selecting previously unselected package tailscale.
(Reading database ... 30170 files and directories currently installed.)
Preparing to unpack .../tailscale_1.44.0_amd64.deb ...
Unpacking tailscale (1.44.0) ...
Selecting previously unselected package tailscale-archive-keyring.
Preparing to unpack .../tailscale-archive-keyring_1.35.181_all.deb ...
Unpacking tailscale-archive-keyring (1.35.181) ...
Setting up tailscale-archive-keyring (1.35.181) ...
Setting up tailscale (1.44.0) ...
Created symlink /etc/systemd/system/multi-user.target.wants/tailscaled.service → /lib/systemd/system/tailscaled.service.
+ [ false = true ]
+ set +x
Installation complete! Log in to start using Tailscale by running:

sudo tailscale up

ubuntu@WinDev2306Eval:~$ sudo tailscale up

To authenticate, visit:

        https://login.tailscale.com/a/XXXXXXXXXXXX

Success.
https://login.tailscale.com/a/XXXXXXXXXXXX
といったようなURLが表示されるので、そのリンクを任意のブラウザで開き、Tailscaleにログインすることで、このWSL2で実行されているUbuntuをTailscaleネットワークに所属させることができます。
この状態でTailscaleに所属している他のマシンからssh接続してみましょう。
今回は同じTailscaleネットワークに参加しているMacから接続してみます。
❯ ssh -l ubuntu windev2306eval
The authenticity of host 'windev2306eval (100.70.248.62)' can't be established.
ED25519 key fingerprint is SHA256:pQAdFPFMb3+VFgxq+S0lOFOyVuSvNTV5BrhQsb5sXtU.
This host key is known by the following other names/addresses:
    ~/.ssh/known_hosts:38: 100.70.248.62
Are you sure you want to continue connecting (yes/no/[fingerprint])? yes
Warning: Permanently added 'windev2306eval' (ED25519) to the list of known hosts.
ubuntu@windev2306eval's password:
Welcome to Ubuntu 22.04.2 LTS (GNU/Linux 5.15.90.1-microsoft-standard-WSL2 x86_64)

 * Documentation:  https://help.ubuntu.com
 * Management:     https://landscape.canonical.com
 * Support:        https://ubuntu.com/advantage

 * Strictly confined Kubernetes makes edge and IoT secure. Learn how MicroK8s
   just raised the bar for easy, resilient and secure K8s cluster deployment.

   https://ubuntu.com/engage/secure-kubernetes-at-the-edge
Last login: Thu Jun 29 09:44:49 2023 from 100.116.202.97
このように接続できました。
Macからみて接続しているLinuxが、実はWindowsの中のLinuxとはとても思えない状況で扱うことができます。
もう一つ、別の方法で接続テストをしてみましょう。
dockerの項目で上げた、
docker run -d --rm --name nginx -p 80:80 nginxnginx(Webサーバー)を実行した状態で、WSL2とは異なるマシン上(すなわちWSL2がインストールされたWindows意外のコンピューター)のブラウザから、WSL2上のLinuxを開いてみます。
今回はMacのSafariから開いてみました。
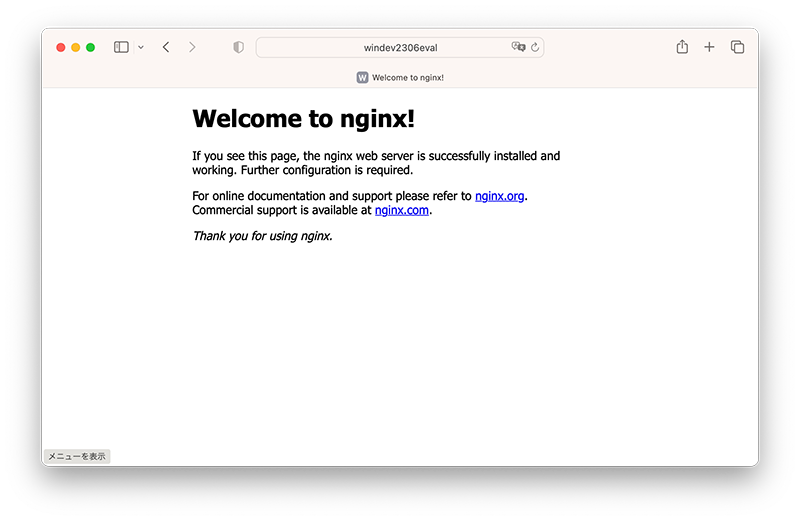
このように表示されることから、Ubuntuで起動しているnginxへアクセスできているのが確認できます。
Windows上にWSL2でLinuxをセットアップし、そこへTrailscaleを入れWebアプリケーション開発を行っている場合、同じTailscaleネットワークに所属してる人達が容易に動作確認を行えるので、たとえリモートワークのような作業状況でも、ペアプロや新人教育など多くのシーンで効率の良い作業が行えると思います。
asdf
asdfとは?
asdfは、複数のプログラミング言語等のバージョンを管理するためのツールです。インストールやアンインストール、バージョンの切り替えが簡単に行えます。複数のプログラミング言語を使っている場合には、非常に便利なツールとなります。
プログラム言語のバージョン管理意外にも使え、たとえばTerraformのインストールや、Poetryのインストールなど、開発や運用に使われるアプリケーションのいくつかを導入可能です。
インストール
以下のコマンドを実行し、asdfに必要なファイルをインストールします。
sudo apt update -y && sudo apt install -y curl gitasdf本体をgithubよりダウンロードします。
git clone https://github.com/asdf-vm/asdf.git ~/.asdf --branch v0.12.0asdfに必要な設定を行います。
. "$HOME/.asdf/asdf.sh"
. "$HOME/.asdf/completions/asdf.bash"
echo '. "$HOME/.asdf/asdf.sh"' >> ~/.bashrc
echo '. "$HOME/.asdf/completions/asdf.bash"' >> ~/.bashrc
以上でasdfの導入は完了です。
以下が実際にインストールしてみた例です。
ubuntu@WinDev2306Eval:~$ sudo apt update -y && sudo apt install -y curl git
[sudo] password for ubuntu:
Hit:1 https://download.docker.com/linux/ubuntu jammy InRelease
Get:2 http://security.ubuntu.com/ubuntu jammy-security InRelease [110 kB]
Hit:3 http://archive.ubuntu.com/ubuntu jammy InRelease
Get:4 https://pkgs.tailscale.com/stable/ubuntu jammy InRelease
略
curl is already the newest version (7.81.0-1ubuntu1.10).
git is already the newest version (1:2.34.1-1ubuntu1.9).
git set to manually installed.
0 upgraded, 0 newly installed, 0 to remove and 56 not upgraded.

ubuntu@WinDev2306Eval:~$ git clone https://github.com/asdf-vm/asdf.git ~/.asdf --branch v0.12.0
Cloning into '/home/ubuntu/.asdf'...
remote: Enumerating objects: 8446, done.
remote: Counting objects: 100% (359/359), done.
略
Or undo this operation with:

  git switch -

Turn off this advice by setting config variable advice.detachedHead to false

ubuntu@WinDev2306Eval:~$ . "$HOME/.asdf/asdf.sh"

ubuntu@WinDev2306Eval:~$ . "$HOME/.asdf/completions/asdf.bash"

ubuntu@WinDev2306Eval:~$ echo '. "$HOME/.asdf/asdf.sh"' >> ~/.bashrc

ubuntu@WinDev2306Eval:~$ echo '. "$HOME/.asdf/completions/asdf.bash"' >> ~/.bashrc
開発言語を導入
前項でセットアップしたasdfを利用し、nodejsとpythonの最新バージョンを導入し使えるようにしてみましょう。
そのために、nodejsおよびpythonプラグインを導入します。
asdf plugin add nodejs
asdf plugin add python
まずはnodejsを入れてみましょう。
asdf install nodejs latest続けてpythonをいれてみます。
pythonをインストールする前に、別途依存関係のあるファイルを導入してきます。
sudo apt install -y libffi-dev zlib1g-dev libssl-dev libbz2-dev libsqlite3-dev libreadline-dev liblzma-dev tk-dev

asdf install python latest
インストールしたnodejsとpythonをシステムで使うように設定してみましょう。
asdf global nodejs latest
asdf global python latest
これで、最新のnodejsとpythonが使えるようになりました。
以下が実際にインストールしてみた例です。
ubuntu@WinDev2306Eval:~$ asdf plugin add nodejs

ubuntu@WinDev2306Eval:~$ asdf install nodejs latest
Trying to update node-build... ok
Downloading node-v20.3.1-linux-x64.tar.gz...
-> https://nodejs.org/dist/v20.3.1/node-v20.3.1-linux-x64.tar.gz
Installing node-v20.3.1-linux-x64...
Installed node-v20.3.1-linux-x64 to /home/ubuntu/.asdf/installs/nodejs/20.3.1

ubuntu@WinDev2306Eval:~$ sudo apt install -y libffi-dev zlib1g-dev libssl-dev libbz2-dev libsqlite3-dev libreadline-dev liblzma-dev tk-dev
Reading package lists... Done
Building dependency tree... Done
Reading state information... Done
略
Setting up tk-dev:amd64 (8.6.11+1build2) ...
Processing triggers for man-db (2.10.2-1) ...
Processing triggers for libc-bin (2.35-0ubuntu3.1) ...

ubuntu@WinDev2306Eval:~$ asdf install python latest
python-build 3.11.4 /home/ubuntu/.asdf/installs/python/3.11.4
Downloading Python-3.11.4.tar.xz...
-> https://www.python.org/ftp/python/3.11.4/Python-3.11.4.tar.xz
Installing Python-3.11.4...
Installed Python-3.11.4 to /home/ubuntu/.asdf/installs/python/3.11.4

ubuntu@WinDev2306Eval:~$ asdf global nodejs latest
ubuntu@WinDev2306Eval:~$ node --version
v20.3.1

ubuntu@WinDev2306Eval:~$ asdf global python latest
ubuntu@WinDev2306Eval:~$ python --version
Python 3.11.4
next.jsを動かし、そのプロジェクトをVisual Studio Codeで編集してみる
導入したnodejsを利用し、next.jsを動かしてみます。
npx create-next-app@latest --typescript色々聞かれますが、エンターキーを押して進めていきましょう。
プロジェクトが作成されたら、作成されたディレクトリへ移動し、npmコマンドでnext.jsを起動します。
cd my-app
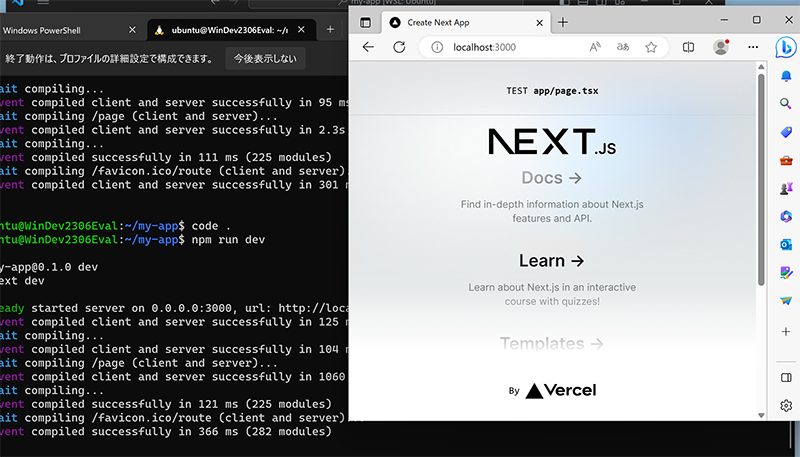
npm run dev以上で、next.jsアプリケーションが起動するはずです。
動作しているか確認してみましょう。
任意のブラウザから
http://localhost:3000/
を開いてみます。
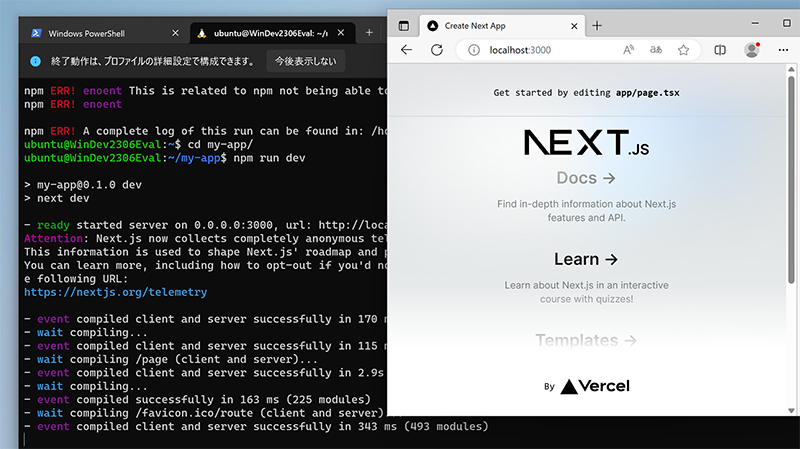
起動していることが確認できました。
次の工程に進むため、起動したnext.jsアプリケーションを停止しましょう。
CTRL+Cキーで停止できます。
ここまで実際に実行した例は以下のとおりです。
ubuntu@WinDev2306Eval:~$ npx create-next-app@latest --typescript
✔ What is your project named? … my-app
✔ Would you like to use ESLint with this project? … No / Yes
✔ Would you like to use Tailwind CSS with this project? … No / Yes
✔ Would you like to use `src/` directory with this project? … No / Yes
✔ Use App Router (recommended)? … No / Yes
✔ Would you like to customize the default import alias? … No / Yes
Creating a new Next.js app in /home/ubuntu/my-app.
Using npm.
Initializing project with template: app-tw
Installing dependencies:
- react
- react-dom
- next
- typescript
- @types/react
- @types/node
- @types/react-dom
- tailwindcss
- postcss
- autoprefixer
- eslint
- eslint-config-next
added 344 packages, and audited 345 packages in 27s
127 packages are looking for funding
run `npm fund` for details
5 moderate severity vulnerabilities
To address all issues, run:
npm audit fix
Run `npm audit` for details.
Success! Created my-app at /home/ubuntu/my-app
ubuntu@WinDev2306Eval:~$ cd my-app/
ubuntu@WinDev2306Eval:~/my-app$ npm run dev
> my-app@0.1.0 dev
> next dev
- ready started server on 0.0.0.0:3000, url: http://localhost:3000
- event compiled client and server successfully in 153 ms (20 modules)
- wait compiling...
- event compiled client and server successfully in 95 ms (20 modules)
- wait compiling /page (client and server)...
- event compiled client and server successfully in 2.3s (463 modules)
- wait compiling...
- event compiled successfully in 111 ms (225 modules)
- wait compiling /favicon.ico/route (client and server)...
- event compiled client and server successfully in 301 ms (493 modules)
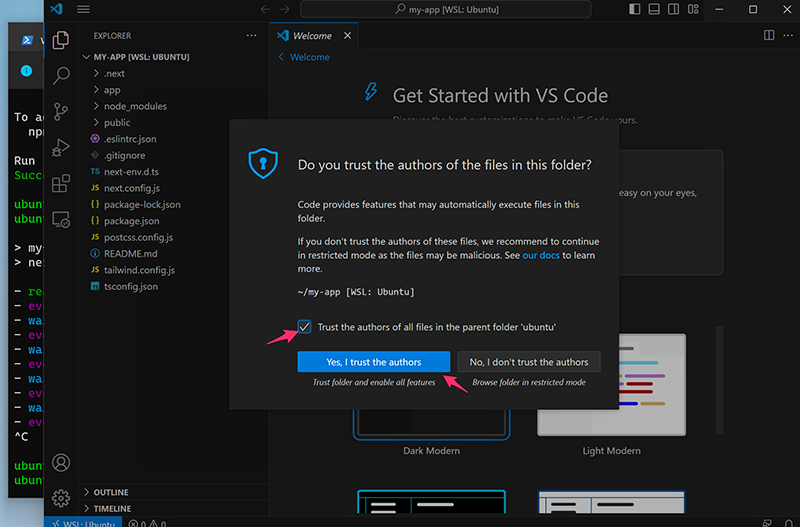
^C続けて、WSL2上のLinux環境を、Windows側のインストールされているVisual Stduio Codeで開いてみたいと思います。
code .と入力し、Visual Stduio Codeを立ち上げてみましょう。
Visual Studio Codeのインストール部分で説明した、Remote Development拡張機能がインストールされているのなら、問題なく開けるはずです。
ubuntu@WinDev2306Eval:~/my-app$ code .
Installing VS Code Server for x64 (695af097c7bd098fbf017ce3ac85e09bbc5dda06)
Downloading: 100%
Unpacking: 100%
Unpacked 1779 files and folders to /home/ubuntu/.vscode-server/bin/695af097c7bd098fbf017ce3ac85e09bbc5dda06.
起動したら、「Trust the authors of all files in the parent folder ‘ubuntu’」にチェックを入れ、「Yes, | trust the authors」ボタンを押しましょう。
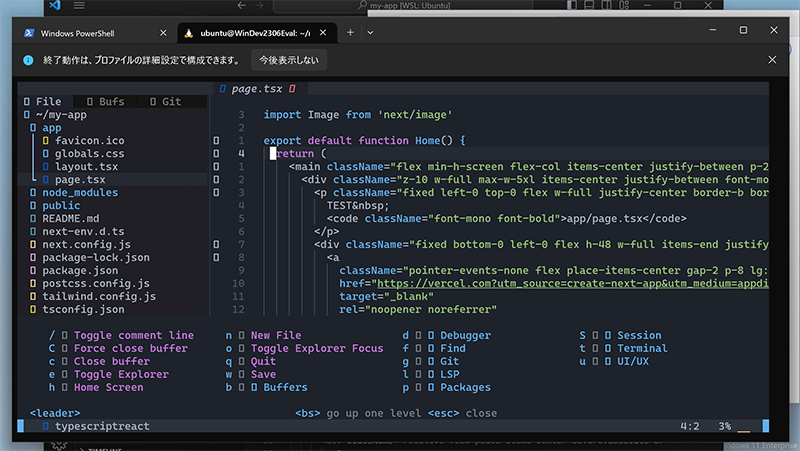
左のファイル一覧からapp/page.tsxを開き、「Get started by editing」の部分を「TEST」に書き換えて保存(CTRL+S)し、再度npm run devを実行してみましょう。
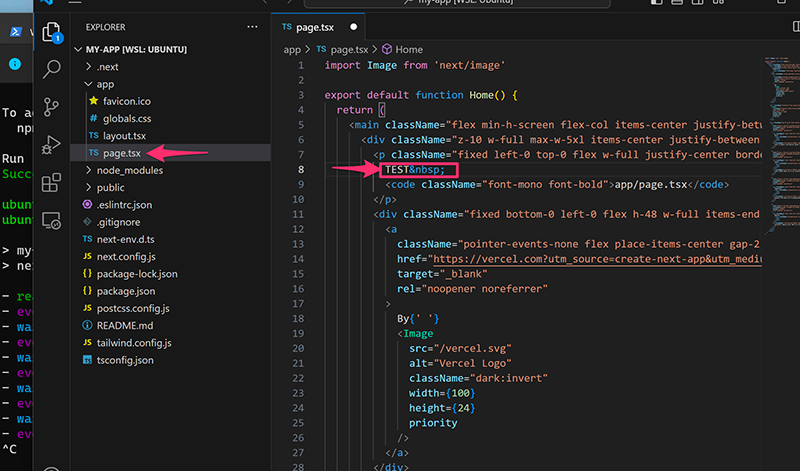
再度ページを表示してみると、上部が「TEST app/page.tsx」に書き換わっていることがわかります。
このようにして、Windows側のアプリケーションであるVisual Studio Codeを使い、Linux側に置いたファイルをシームレスに編集しながら開発を行うことができます。
便利ツールを入れていこう|WSL2・Ubuntuインストール後
Homebrewで色々な便利ツールを入れていきます。
lazydocker
コマンドが苦手な人でも、わかりやすくdockerの情報を表示し、dockerを操作することができます。
以下のコマンドでインストールし起動できます。
brew update && brew install lazydocker
lazydocker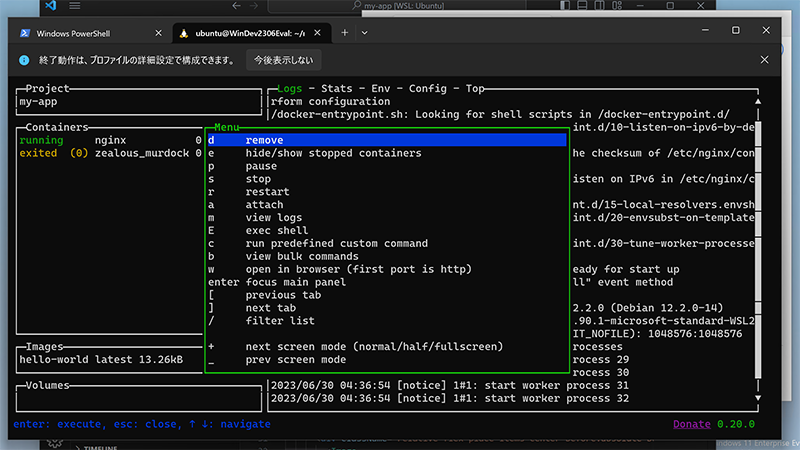
dockerに関する詳細な情報を手軽に収集しつつ、ワンキーで色々な操作が行なえます。
lazygit
lazydockerのgitバージョンです。こちらもサクサクとgitを操作できます。
brew update && brew install lazygit
lazygit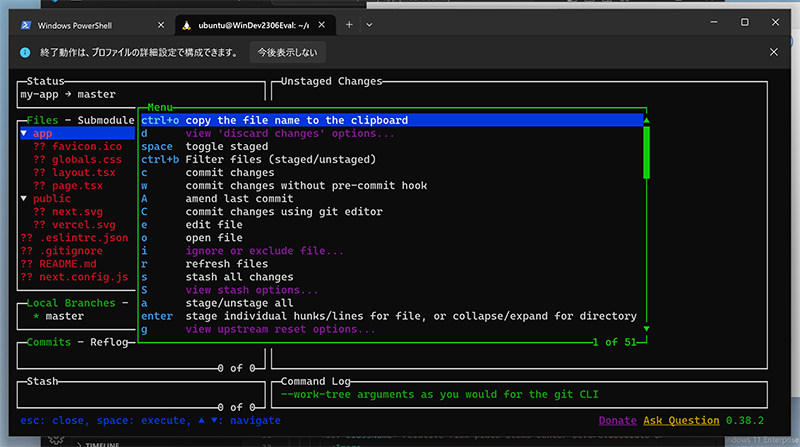
開発を始めたいが、gitのコマンド操作に慣れていないという方におすすめです。
AstroNvim
ほとんどの操作やファイルの編集などはVisual Studio Codeで行えます。しかしながらLinuxを触っていると、vimなどで操作をしないといけないシーンに出会うことはよくあります。
そのため、vimの操作を必死に覚えようとするのですが、これが根っからのWindowsユーザーには結構つらい作業だったりします。
vimは適切な設定をおこない拡張機能を入れていくことで使いやすくできますが、そもそもLinuxになれてない、vimになれていない人にとっては、この前段の作業すら困難なわけです。
そこである程度設定済みのvimをいれておくことで、いざというとき作業効率をよくしたり、vimそのものを触るモチベーションを高めることができるのではないか?と思いました。
そういうときに便利なのが、AstroNvimです。
AstroNvimはneovim(というvimの一種)の上に、使いやすくする設定を被せてくれるものです。
以下のコマンドでインストールしてみましょう。
brew install neovim
git clone --depth 1 https://github.com/AstroNvim/AstroNvim ~/.config/nvim
nvim
インストールし、起動を行うと、いくつかのプラグインなどが自動的に入ります。
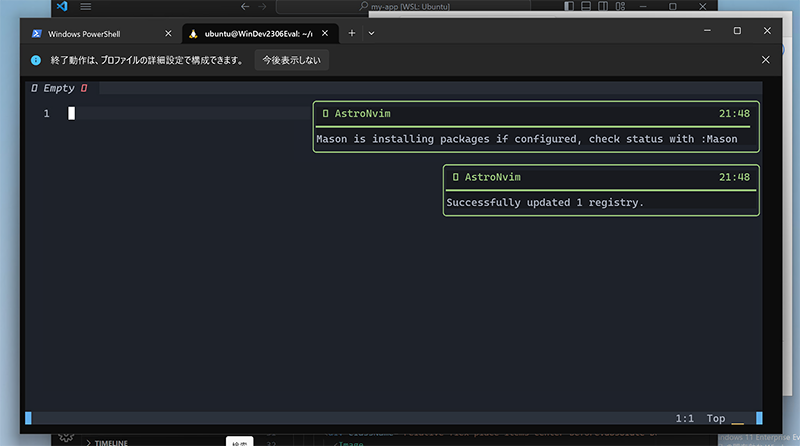
色々な設定が初期状態で入ってくれているおかげで、ちょっとした設定やコマンドを入力するだけで使いやすいvimベースのIDE環境が手に入ります。
まとめ
できる限りコマンド入力にたより環境構築をおこない、ちょっと便利な開発環境を作り上げてみました。実際に開発に使おうとすると、もう少し細かい設定は必要になると思います。
WSL2が登場する前は、Linux開発環境を作る=仮想マシン(VirutalBox / Vagrantなど)を入れるでした。
WSL2は昔ながらの仮想マシンセットアップと違い、立ち上げるのにそれほど時間はかかりません。
それに加え、仮想マシンではできない・やりにくいWindowsとのシームレスな連携、軽快な動作、仮想マシン以上の作り上げた環境のポータビリティ(エクスポートすることでバックアップ、移動、複製が容易に可)など、仮想マシンにはない多くのメリットがあります。
WSL2を一度も使ったことがないというWindowsユーザーの方は、ぜひ一度触ってみてください。
おまけ:WSL2導入後のTIPS
LinuxからWindows側のファイルを参照する|WSL2
/mnt/cを参照することで、Windows側のファイルを見ることができます。

vimなどで、直接ファイルを編集することもできます。
ubuntu@WinDev2306Eval:/mnt/c$ nvim /mnt/c/Users/User/test.txtWindowsからLinux側のファイルを参照する|WSL2
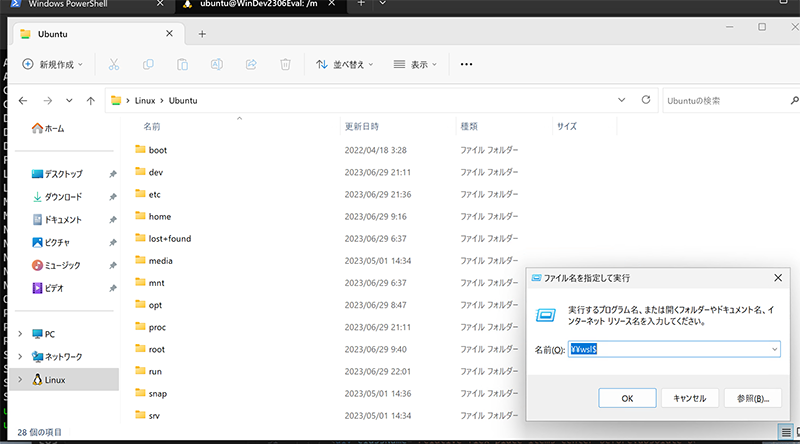
ファイル名を指定して実行(Windows キー + R)より、「\wsl$」を入力(\は日本語で言う¥(実際は半角で打つ)のことを指しています)することで、WSL2側のファイルを開けます。
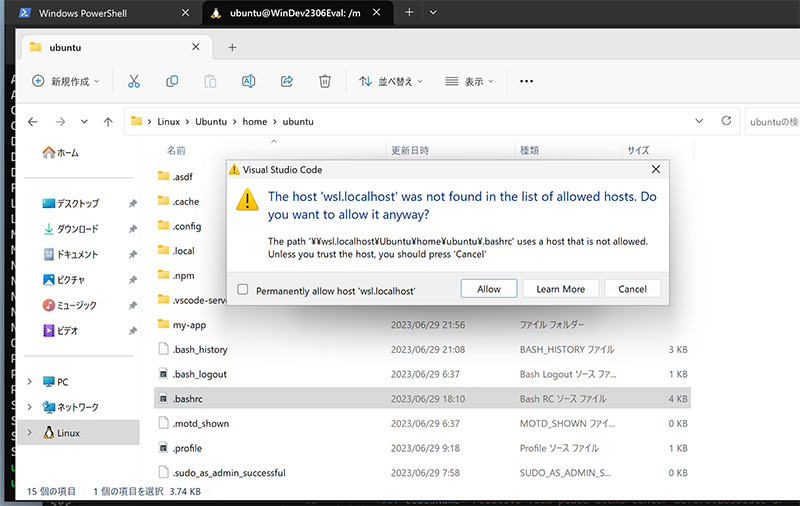
Visual Studio Codeなどで、直接ファイルを開くことできますが、初回は警告が出ます。
Allowを選択することで開くことが可能です。
開発用マシンを日本語環境に設定変更する|WSL2
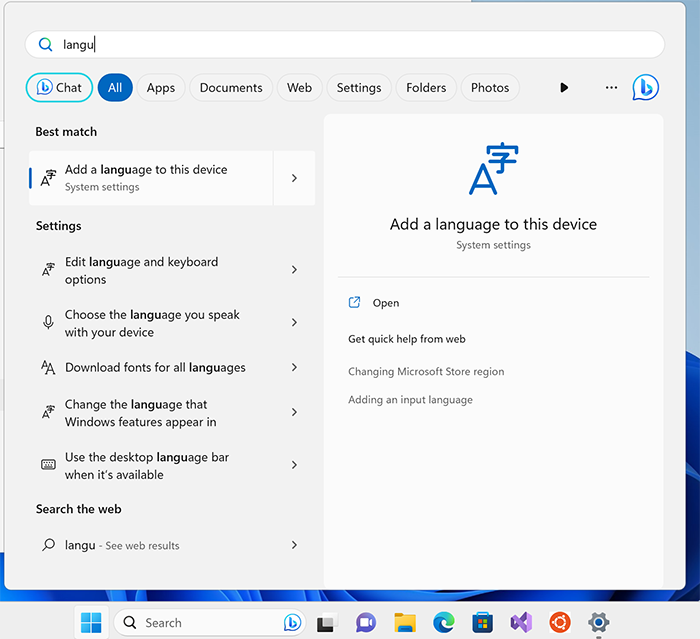
スタートメニューへ「langu」と打つことで、言語設定変更画面へのショートカットが表示されます。
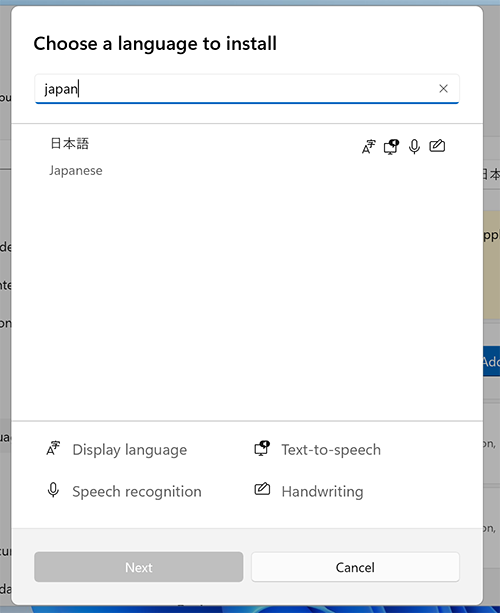
「Add a language a this device」を選択し、「Langueage & region」画面を開き「Add a language」ボタンを押します。
「Choose a language to install」画面に「japan」と入力することで、日本語が候補に表示されますので、Nextボタンを押して確定させます。
日本語のインストールが作業が終わると「Sign out」ボタンが表示されるので、サインアウトして日本語化は完了です。

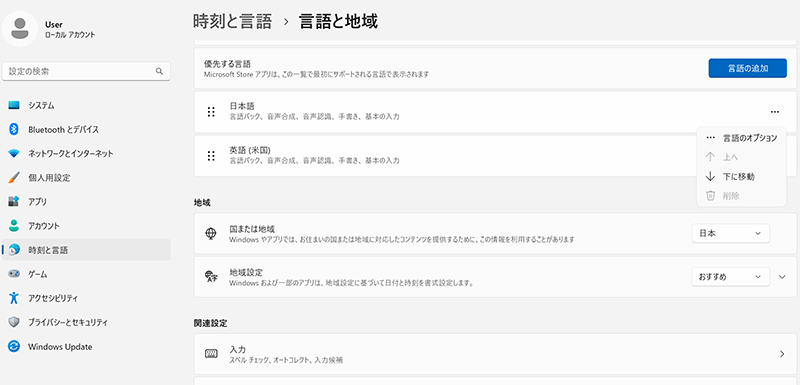
ただしこの作業だけでは、キーボードが英語配列認識されていたり、日本語入力ソフトが入っていないなどの問題が残ります。
この問題を修正するには、追加した日本語の横にある「…」を押し、「言語のオプションを開きます」
キーボードレイアウトを「英語キーボード(101/102キー)」から「日本語キーボード(106/109キー)」に変更し再起動します。
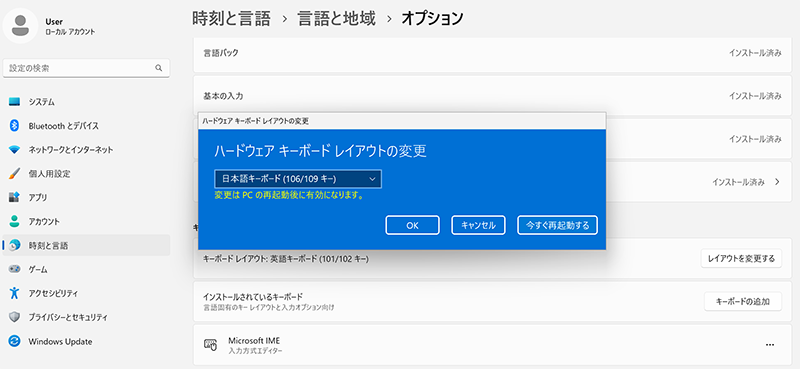
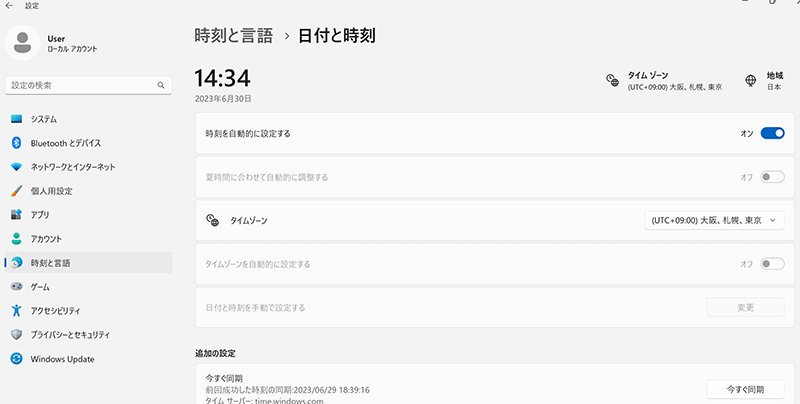
最後にタイムゾーンを「UTC+09:00 大阪、札幌、東京」に変更して完了です。
<おすすめ記事・メディア>