こんにちは、見習いフロントエンジニアのぱやぴです。
今回はframer-motionを使用して、React+Typescriptでカレンダーコンポーネントに月の変更時のアニメーションを追加する方法を紹介します。
はじめに
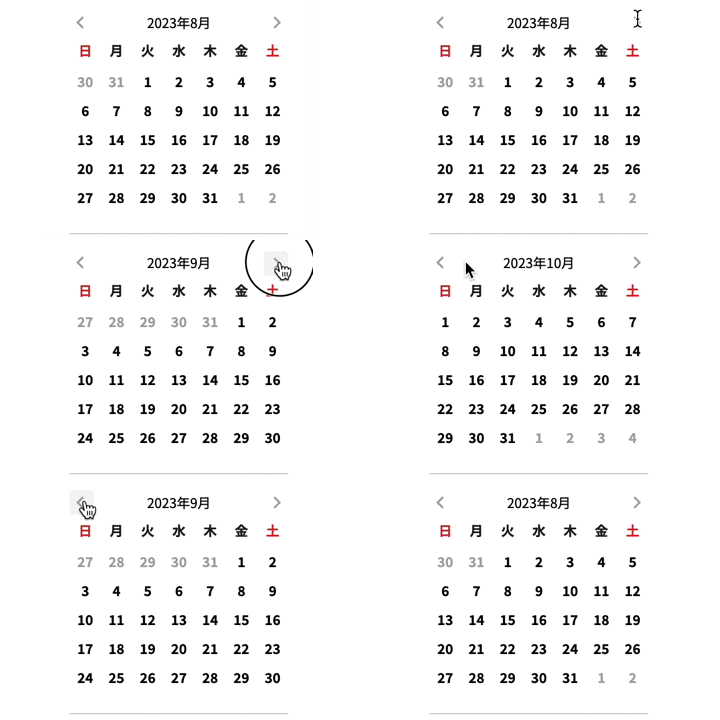
まず、完成したものをご紹介します。
(フレーム数の問題でカクカクしていますが、実際はスムーズに動作します!)

実装
それではアニメーションの実装をしていきます。。
使用技術
- TypeScript: “^4.8.4”
- React: “^18.2.0”
- framer-motion: “^9.0.0”
- date-fns: “^2.29.3”
アニメーション作成前の準備
まず、date-fnsを使用して以下のようなコンポーネントを作成しました。
import { addMonths, subMonths } from "date-fns";
import { useState } from "react";

import { Month } from "./Month";
import { CalendarHeader } from "./CalendarHeader";

export interface CalendarProps {
  date?: string;
}

export const Calendar = ({date}: CalendarProps) => {
	const currentDate = date ? new Date(date) : new Date();

  const [month, setMonth] = useState(currentDate);

  const onNext = () => {
    setMonth(addMonths(month, 1));
  };
  const onPrev = () => {
    setMonth(subMonths(month, 1));
  };

  return (
    <div>
			<CalendarHeader onNext={onNext} onPrev={onPrev} month={month} />
      <Month month={month} />
    </div>
  );
 };
アニメーションの作成
まず、アニメーションの定義を行います。
月が進む場合と月が戻る場合の2つのパターンのアニメーションと最終的な位置を決めます。
月が進む場合は右から、月が戻る場合は左から移動してくるように設定し、最終的に0になるようにしました。
const variants = {
  enter: (isNext: boolean) => {
    return {
      x: isNext ? 100 : -100,
      opacity: 0,
    };
  },
  center: {
    x: 0,
    opacity: 1,
  },
};
状態の作成
月が進んでいるか戻っているかの状態を管理し、月を変更するタイミングで状態を更新します。
const [isNext, setIsNext] = useState<boolean>();

const onNext = () => {
  setMonth(addMonths(month, 1));
  setIsNext(true);
};
const onPrev = () => {
  setMonth(subMonths(month, 1));
  setIsNext(false);
};
アニメーションの適用
アニメーションを適用したいコンポーネント(今回はMonthコンポーネント)をmotion.divコンポーネントで囲み、アニメーションの設定を行います。
import { motion } from "framer-motion";
~~~
return (
  <div>
    <CalendarHeader onNext={onNext} onPrev={onPrev} month={month} />
    <motion.div
      key={month.toString()}
      custom={isNext}
      variants={variants}
      initial="enter"
      animate="center"
      transition={{
        opacity: { duration: 0.2 },
        x: { type: "spring", stiffness: 300, damping: 30 },
      }}
    >
      <Month month={month} />
    </motion.div>
  </div>
);
customプロパティに渡した変数は、variantsプロパティで渡した関数の引数として使用されます。
initialプロパティには描画時のアニメーション、animateプロパティには描画後のアニメーションを設定します。
transitionプロパティを使用することで、opacityの速度やx軸の移動方法など、さまざまな設定を行うことができます。 詳細な設定については、以下のリンクで確認できます:https://www.framer.com/motion/transition/
今回はxの動きに"spring"を使用して、少し反発するようなアニメーションに設定しています。
初回描画時のアニメーション
上記のままでは初回のカレンダー描画時に月が左からスライドインするようなアニメーションが発生します。
初回のみアニメーションを行わないようにするため、initialプロパティに条件分岐を追加しました。
~~~
<motion.div
  key={month.toString()}
  custom={isNext}
  variants={variants}
  initial={isNext === undefined ? "center" : "enter"}
  animate="center"
  transition={{
    opacity: { duration: 0.2 },
    x: { type: "spring", stiffness: 300, damping: 30 },
  }}
>
  <Month month={month} />
</motion.div>
~~~
完成図
import { addMonths, subMonths } from "date-fns";
import { motion } from "framer-motion";
import { useState } from "react";

import { Month } from "./Month";
import { CalendarHeader } from "./CalendarHeader";

const variants = {
  enter: (isNext: boolean) => {
    return {
      x: isNext ? 100 : -100,
      opacity: 0,
    };
  },
  center: {
    x: 0,
    opacity: 1,
  },
};

export interface CalendarProps {
  date?:

 string;
}

export const Calendar = ({ date }: CalendarProps) => {
  const currentDate = date ? new Date(date) : new Date();
  const [month, setMonth] = useState(currentDate);
  const [isNext, setIsNext] = useState<boolean | undefined>(undefined);

  const onNext = () => {
    setMonth(addMonths(month, 1));
    setIsNext(true);
  };
  const onPrev = () => {
    setMonth(subMonths(month, 1));
    setIsNext(false);
  };

  return (
    <div>
      <CalendarHeader onNext={onNext} onPrev={onPrev} month={month} />
      <motion.div
        key={month.toString()}
        custom={isNext}
        variants={variants}
        initial={isNext === undefined ? "center" : "enter"}
        animate="center"
        transition={{
          opacity: { duration: 0.2 },
          x: { type: "spring", stiffness: 300, damping: 30 },
        }}
      >
        <Month month={month} />
      </motion.div>
    </div>
  );
};
最後に
framer-motionを使用することで、簡単にアニメーションを追加することができました。 アニメーションを追加するだけで、より洗練されたコンポーネントになりました!
framer-motionを使えば、比較的簡単に複雑なアニメーションを作成できますので、さらに学習を進めて、プロダクト内で活用できるリッチなコンポーネントを作成していきたいと思います。
読んでいただき、ありがとうございました。何か参考になれば幸いです。


